Full of greens pancakes

I make masses of pancakes – regular sugar and lemon Shrove Tuesday ones, Scotch pancakes which for some reason we used to call Cold Feet, fat fluffy American pancakes and veggie ones.  Lots and lots of veggie pancakes.  Not only are they delicious but a great way of slipping extra veg into reluctant customers (my children) and to use up a glut – I must have made a 1000 courgette and feta type pancakes when we had a courgette glut a couple of years ago.

You can customise these according to what you have – I tend to use something a little starchy like the peas/broad beans or some cooked/canned pulses plus fresh veg such as broccoli or spinach along with any soft herbs I have.  At the moment wild garlic is going into lots of things as we have some growing here but otherwise a clove of garlic adds a gentle hum.  If you use courgette (and it is delicious) then grate it and squeeze out as much water as you can so the batter isn’t too wet.   Same with carrots and parsnips which benefit from grating and any excess water being removed.

I used a couple of spring onions that needed their last hurrah but you could use chives if that’s what you have.  Chunks of feta or cheddar work well and make these even more substantial.  You can add finely chopped chilli or a pinch of cayenne if everyone you are cooking for is receptive – I like to add my heat via a generous squirt of sriracha.

Incidentally these make a wonderful breakfast topped with a fried or poached egg and some Greek yogurt to which you’ve added a swirl of sriracha, just saying….
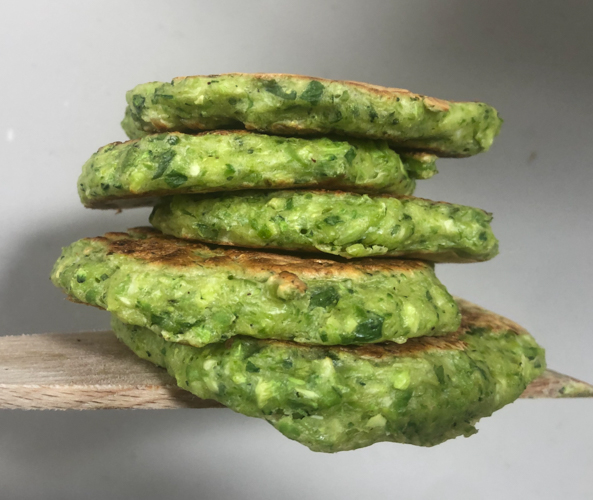
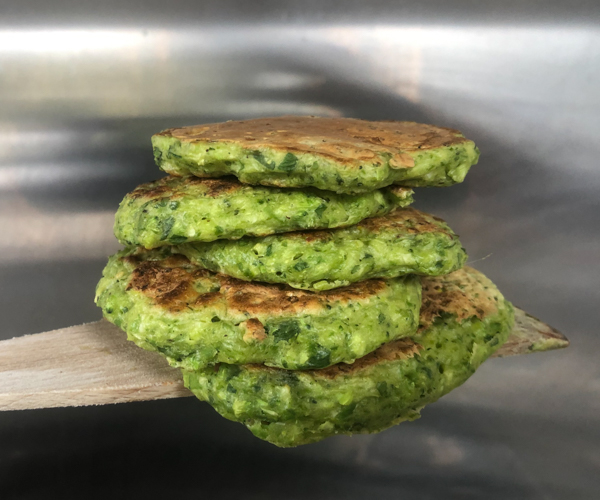
Veggie pancakes

Below are the quantities I used for the pancakes you see in the pictures.  As long as the amounts are roughly in line you can pretty much freestyle as you please.  A tin of sweetcorn also works if you don’t have any peas or pulses.  Add or subtract herbs depending on what you have and what you like – these pancakes are very flexible. If you don’t have any self raising you can use plain flour plus 1/2 teaspoon baking powder.

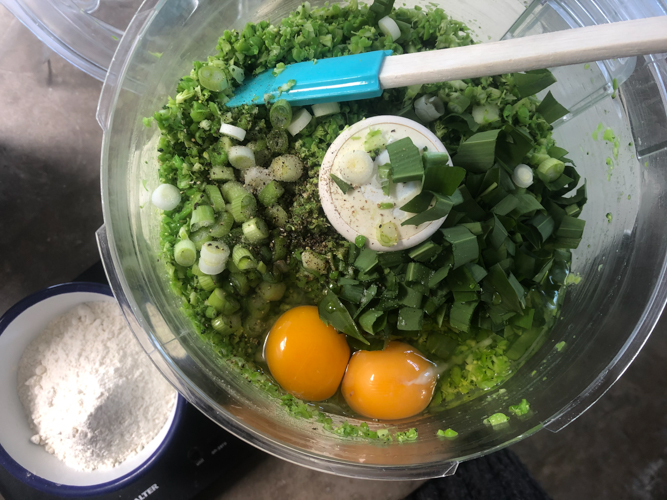
300g peas, blanched for 1 minute if frozen

1/2 head of broccoli, approximately 200g, chopped fairly small, core included

3 spring onions, finely chopped

Small handful of parsley

Small handful of wild garlic, entirely optional

2 eggs

200g self raising flour (see intro)

50g Greek yogurt, or regular plain yogurt

A little olive oil

Put everything except the oil into a food processor, season well and blend.  Leave a bit of texture, you don’t want it baby food smooth.  Heat a little oil in a large frying pan and add tablespoons of the batter, leave for a few minutes until turning golden on the bottom when you peek and then turn.  Cook for a few minutes on the other side and then keep warm while you cook the rest.  The above was enough for 4 for lunch with a salad.


Easy tomato soup with herby garlic oil

I always feel terrible about throwing any food away that I have let slip the net and these days, more than ever.  If there was a time for using every last scrap then its now.  For instance, beetroot leaves that I always try and use but inevitably sometimes find their way to the chickens were chopped the minute I got back from the farm shop last week and sautéed with garlic and chilli. Extra delicious because we ate them rather than our feathery friends.

We can no longer pick a recipe and then go and buy exactly what’s required, rather we have to look at what we have and cook accordingly.  I quite like this challenge so do let me know if you need any ideas.

This was lunch yesterday rustled up from mainly store cupboard ingredients, without using too much of our fresh supplies, very easy, cheap and was properly delicious.   Making the herby oil was just a way of using some of the wild garlic that is around at the moment.  I realise not everyone has access to this so if you have some soft herbs or rocket in the fridge that need using up these will make a wonderful, deep green oil full of flavour which is fabulous with the tomato soup.

Don’t worry if you don’t have any of the red lentils I use to thicken the soup – a handful of rice or a large peeled and chopped potato added instead of the lentils will break down and once blended do a fine job of thickening your soup.   I suspect we will be having this more than once, next time I might add some dried chillies instead of the oregano.  Just use what you have.

Easy tomato soup with herby garlic oil

1 small onion, finely chopped

1 clove garlic, finely chopped

1 tablespoon olive oil

A good pinch of dried oregano (if you have some)

3 tablespoons dried red lentils (see intro)

1 x 400g can chopped tomatoes

Splash of white wine (if you have some and can spare it)

500ml vegetable stock

100ml milk

A handful of wild garlic or soft herbs/rocket that need using up

A clove of garlic if you aren’t using wild garlic

100ml olive oil

Heat the oil in a large pan and cook the onion gently until soft.  Add the garlic and the oregano if you are using it and stir.  Add the lentils followed by the wine if you are using it and the stock.  Let it simmer, covered, for about 20-30 minutes until the lentils have broken down.  Remove from the heat, add the milk and whizz with a hand held blender until smooth, taste (cautiously, it will be hot) and season.  Either serve immediately or reheat when required.   Blend the oil with the wild garlic or the herbs/rocket and garlic with a pinch of salt and swirl into the soup.  Serves 4.

Red cabbage, radish and herb salad

Here is a blast of colour to brighten your January day.  Not only is this salad glorious to look at it also tastes fabulous.   Crunchy raw veg always feels like it is doing us good but can, on occasion, be hard work to chomp through.  This however is an absolute joy to eat with its tangy, sweet and sour dressing and handfuls of herbs alongside the crunch of the radishes and cabbage.

I have mentioned before my aversion to stringent diets, casting aside any of the food groups or making January a form of penitence to salve our conscience following the season of plenty.   Food should be a pleasure, a treat to look forward to everyday and even if you are hoping to shake off a couple of pounds there is no reason why breakfast, lunch and supper shouldn’t be a feast.   You will find plenty of salads amongst my posts, not just leafy green ones although I won’t have a word said against my Favourite Green Salad (January 2014) but ones jammed with other ingredients full of crunch and flavour, freshness and colour.  Try the Thai-ish salad (November 2015), Roast Aubergine, Feta and Mint (July 2015), the Blood Orange, Beetroot and Feta (January 2014) or maybe the Celeriac Remoulade (January 2016) to which I quite like to add some sharp, crunchy apple if the mood takes me.

In short raw veggies are a great way to get yourself back on track.  You are eating healthily whilst tucking into something delicious – win, win.  I can’t recommend this one enough, I got the idea for the reduced dressing from an Ottolenghi salad and then tinkered around until I had this.  Easy and quick it always goes down a treat and that belt of pink, green and magenta goes a long way to lifting spirits on a dreary, grey day.

Red cabbage, radish and herb salad

1/4 red cabbage, finely chopped

10 radishes sliced

20g (a big handful) rocket

20g mint

20g coriander

50ml lime juice (roughly 2 limes)

2 tablespoons maple syrup

1/4 teaspoon chilli flakes

1 tablespoon soy sauce

2 tablespoons light olive or sunflower oil

Toasted sunflower and pumpkin seeds, a handful (optional)

Heat the lime juice, maple syrup, chilli flakes and soy in a small pan until syrupy then add the oil, mix well and leave to cool.  When you are ready to serve roughly chop the rocket, mint and coriander then mix together with the cabbage and radishes in a bowl along with the dressing.  Sprinkle with the seeds if you are using them.  Serves 2 for lunch or 4 as a side.


Tomato, cheese and mustard tart


I can’t remember where this recipe first came from.  I remember my Mother would make it, a classic for Saturday lunches but then I remember a friend of hers, Antoinette, also making it.  Hardly a surprise they were both fans, utterly simply to make and from ingredients you may well have to hand.  I like recipes with a smattering of nostalgia.  Food has moved on so far from what I grew up with and these days we eat a range of cuisines that that child of the ’70’s would barely recognise.  So, amidst the larbs and green curries, the free from cakes and oat milk flat whites I relish coming across those old friends from the past.  Chilli and Spag Bol, Rhubarb crumble and toad in the hole.  All these are classics for a reason and welcome at my table anytime.

So it is with this tart.  Four ingredients, yes just four ingredients and you have a top lunch with a surprisingly satisfying flavour combination.   Sweet tomatoes with savoury cheese atop the tang of mustard and crispy pastry – come on, you know its going to taste good.

Warm with a salad for lunch, perhaps along side some other bits and pieces, soup, good bread, olive etc – that sort of picnic arrangement that always looks such a feast on the table.  It is also good cold and has even made it into the odd packed lunch.  A winner.

Tomato, cheese and mustard tart

As is my way I have tried various additions, slow cooked onions and peppers with the tomatoes, different cheeses etc but whilst delicious, those things are for another day, another tart.  This one shines with the simplicity and harmony of the three toppings.

1/2 a 500g puff pastry

2 tablespoons dijon mustard

3 good size tomatoes, core removed and sliced

100g strong cheddar, grated

Preheat the oven to 200 and put a baking sheet in to heat.  Roll out the pastry on a piece of parchment to a rectangle about the thickness of a pound coin.  Spread with the mustard not quite to the edge and then layer the tomatoes on top.  Season well and then sprinkle over the cheese avoiding the edges.  Transfer the pastry on the parchment onto the hot baking sheet and cook for 20 minutes at 200 and then lower the oven to 180 for a further 10-15 minutes.  After this time the pastry underneath should be bronzed and super crisp.  Allow to sit for five minutes before serving, enough for 2 as it is or 4 alongside other things.


Pulled Pork

I can’t count how many times I have cooked this – any time of year it seems perfect, particularly when we have a load of friends round.  Very little hands on time, works a dream if you make it ahead of time and is an unbelievably economic way to feed a crowd. Did I forget to mention that it is also downright delicious.   Super tender, long cooked soft pork bathed in a sweet, spicy and tangy barbecue sauce stuffed in a soft bap with my crunchy, zippy fresh Christmas salad, topped with quick pickled onions and hot sauce.  Seriously, what is not to love.

I have made this with a whole shoulder and it made a huge amount, more than enough for 20 with extra for the freezer (a super useful number to have stashed away and it reheats a treat).  I tend to make this more often then with half a shoulder, rather easier to marinade and manoeuvre – last weekend one did 8 children and 6 adults with seconds.  I cooked it fully on Friday, shredded it (easier whilst warm) mixed it with the sauce and then reheated it in the oven on Saturday.  Too easy for words.

The Christmas salad (December 2013) despite its name is also a year round winner, crunchy and tangy, it works so well with the pork, they complement each perfectly.  Quick pickled onions (August 2014) bring a sweet/sour tang to the party and I couldn’t countenance my assembly without a good squirt of sriracha on top.

For pudding last weekend I made my son’s favourite, the Giant Strawberry Mivvi (June 2014), see the picture below.  This is a summer treat we look forward to all year and as it needs to be made ahead is another good one for entertaining.

Pulled Pork

1 heaped tablespoon paprika

1 heaped teaspoon smoked paprika

2 teaspoons fine salt

1 heaped teaspoon cumin

1/2 teaspoon cayenne

2 tablespoons soft brown sugar

20 turns of the black pepper mill

Shoulder of pork, around 5/6lbs

50ml cider (or white wine) vinegar

1 bottle good barbecue sauce

Mix the first 7 ingredients together in a bowl then rub into all sides of the pork.  Wrap tightly in cling film and leave in the fridge for at least 4 hours or up to overnight.  When you are ready to cook, preheat the oven to 200 and let the pork come to room temperature.  Put into a baking pan not much bigger than the pork, put the 50ml vinegar and 50ml water in the bottom of the pan (don’t pour it over the pork or it will wash off some of the spices) and cover with foil. Put in the hot oven and immediately turn it down to 160 and cook for 6-7 hours until the meat falls apart when prodded with a fork.   Pour all the cooking liquid into a pan, skim off the fat, pour in the barbecue sauce and simmer gently for 20 minutes until slightly thickened.  Meanwhile remove and discard the layer of fat from the pork, shred the meat and return to the baking pan.  When the sauce is ready pour it over the pork, mix well and serve.

Roasties with Chive Yogurt

Occasionally it’s not so much a new recipe I need, more a hint or reminder of something. After all I have many, many cook books full of recipes but sometimes lack of energy, time or ingredients mean I’m looking for an old favourite rather than a new idea.

So yes, this is a recipe for roast potatoes but how often do you think of roasties aside from Sunday?  These are an absolute winner and get eaten ridiculously quickly whenever I make them.  Not just any old roast potatoes these are canapé potatoes or something else for a mezze type lunch potatoes.   Pimp them up if you wish, a good dusting of paprika or chilli flakes would add pep and a handful of rosemary always works but I like them just like this, with salt and their tangy, chive and yogurt side.

I guess they are a little like potato skins – I know you can make these by baking potatoes and then removing the fluffy contents leaving you with the skins to roast and crisp but I never have.  I do however like the combination of crispy crunchy potatoes with a sour cream and chive style sauce.   This then is my way of doing things – you get the crispy skins but also the fluffy interior and I’ve gone for a yogurt based dip, similar but a little lighter and tangier than the original.

Sometimes I serve these alongside a main course but more often they are offered in their own right – a starter or a grazing treat to go with drinks before lunch or dinner.  A little dish of sriracha alongside offers that heavenly combination of the cold and creamy yogurt with a belt of chilli heat.  It’s not a spanking new fangled recipe, just the re working of an old favourite.

Roasties with Chive Yogurt

This is easily doubled or trebled which I would highly recommend.

500g potatoes, Maris Piper or similar

Olive oil

Salt

150g Greek yogurt

A handful of chives, finely chopped

A small clove of garlic, crushed (optional)

Preheat the oven to 200.  Cut the potatoes into chunks about the size of a large walnut.  Put into a large pan of salted water, bring to the boil and simmer for 10 minutes.  Drain really well, shake briefly in the colander and then put into a large roasting pan, add enough oil to just coat, turning the potatoes well.  Sprinkle with salt and roast near the top of the oven for 40-50 minutes until deeply golden and crunchy at the edges.   Meanwhile mix the yogurt, chives and a good pinch of salt and let down with a little water if you prefer a runnier dip.  Mix in the garlic if you are using.   Serve the potatoes on a large plate with the dip and perhaps some sriracha along side.   Serves 3-4 as a snack.


Chicken with Flageolet Beans, Leeks and Rosemary

I am on a bit of a mission to increase our intake of pulses – they are cheap, filling and with a little magic can be quite delicious.  I love them (now) but one of my children isn’t mad about them so inevitably I have a bee in my bonnet to think of delicious ways to serve them up.  To be fair I didn’t really like pulses much when younger and would pick them out of a cassoulet or chilli and line them up around my plate.  It was always disappointing then to be asked to finish them, at this point cold and without anything more palatable to help them on their way.

This is a delicious combo then, leeks and beans to please me and crispy skinned chicken to please us all.  Don’t panic that four thighs aren’t enough, this is surprisingly filling and you can always serve another green veg or perhaps a crusty baguette and salad alongside.

The leeks, flageolet and rosemary work particularly well together and this makes a great side dish to roast lamb.  Pop it into an ovenproof dish, top with breadcrumbs and finish in the oven until crispy above and bubbling beneath.

Roast chicken with leeks, flageolet beans and rosemary

You can of course use dried flageolet, just remember to soak and cook them according to pack instructions prior to using them below.

4 chicken thighs

2 tablespoons olive oil

1 large or two medium leeks

1 clove garlic, finely chopped

1 sprig rosemary, leaves finely chopped to yield around 1 teaspoon

1 tin (400g) flageolet beans, drained and rinsed

250ml chicken stock

2-3 tablespoons double cream

Chopped chives or parsley (optional)

Heat the oven to 200, put half a tablespoon of the oil into a roasting tin, turn the chicken in the oil, season with salt and cook for half an hour.  Heat the remaining oil in a large frying pan and cook the leek gently, without colouring, until soft.  Add the garlic and rosemary, cook for a minute or two then add the beans, stock and cream.  Simmer for about 10 minutes until a little reduced then check for seasoning.   After its 30 minutes remove the chicken from the oven, add the leek mixture to the pan without getting sauce on the now crispy skin and return to the oven for a final 5-10 minutes until gently bubbling and gold skinned. Scatter over the chives or parsley if you are using them.  Serves 4.


Chicken with Harissa, Potatoes and Broccolini

A few of you may recognise this as one of my earliest recipes on these pages.  So long ago in fact that it doesn’t even have a photograph.  Although I cook my recipes over and over again this is the first time I’ve duplicated one here.  The reason being I  felt it lacked fanfare originally and is such a reliable and delicious lunch or supper that I thought it deserved a shout out, as they say.  Also and somewhat inevitably, I have tinkered with it adding potatoes to the original to make it a complete one pan meal.

It is this sort of dish that I find an absolute Godsend on weekdays when I’m frazzled and need to think of (yet another) family supper that is quick, easy, undemanding, not too expensive and above all delicious – clean plates after all are what we want to see.  This ticks all those boxes, cooked in one pan which you can bring to the table, incorporates potatoes, meat and veg along with a super easy spice addition by way of the harissa. I refer you here to a comment I made about the original which still stands – “Crisp skinned chicken sliding off the bone in a spicy red jacket with crunchy greens to give verdant vigour!”

Chicken with Harissa and Broccolini

If you like things a little spicier feel free to add more harissa and if you want it a little saucier, add a glug of white wine with the final teaspoon of harissa.

1 tablespoon olive oil

8 chicken thighs, bone in and skin on

8 waxy potatoes, halved

5 teaspoons harissa paste

1 pack tenderstem broccolini

Chopped parsley (optional)

Preheat the oven to 190.  Put the potatoes and oil in a large baking pan and turn to coat.  Put half a teaspoon of harissa under the skin of each thigh and squidge a bit to spread.  Put the chicken in with the potatoes, season and roast 30 minutes.  Towards the end of this cooking time blanch the broccolini in boiling water for 1 minute and drain.  Remove the chicken from the oven, stir the last teaspoon of harissa into the cooking juices and then fit the broccoli in and around the chicken and potatoes (put some of the chicken on the potatoes if that helps).  Return to the oven for 10 minutes.  Season, sprinkle with parsley if you like and serve, this is enough for 2 adults and 2 children but you can multiply it at will.

Greens with garlic and soy

Greens with garlic and soy

I have a feeling these greens could be magic.  My daughter really doesn’t like broccoli, in fact she has an aversion to most green veggies, however not only will she happily help herself to these without encouragement (bribery) but will have seconds.  Unbelievable.  I’ve mentioned before that its one of my life’s works to find a way my children will enjoy all, or most, vegetables and this is one of those successes.   I imagine the garlic and soy sauce go a long way towards making these so ridiculously delicious.  Whatever it is, I maximise the advantage and these are served regularly at my table alongside all manner of stir fries or anything with an Asian note.

Quick, healthy, cheap, delicious – what is not to like about this dish.  I am happy to tuck into these for a lone lunch and indeed ate, or rather greedily scoffed, the greens you see in the picture for lunch today.   A side of rice would have worked well to soak up the delicious sauce but I didn’t even get round to that.   We had something like this at Wagamama and loved the simplicity and crunch so couldn’t wait to have a go making it myself.  I suspect the original may have some additional ingredients but I couldn’t suss them and regardless love the pared down ingredients in the recipe below as much as the flavour.  You could add a pinch of chilli flakes if you want or a squirt of Sriracha to the greens but honestly, they don’t need it.

Greens with Garlic and Soy

Use any crunchy greens that catch your eye.  I always use broccolini and pak choi as that was what I had first had.  This time I’ve added the last of the green beans from the garden and you could use regular broccoli if that is what you have.   Going completely off piste, carrots work well in this application although they take longer to lose their raw crunch so bear this in mind before you add the garlic and soy.  Just thought you should know.

1 tablespoon oil

1 head of pak choi cut into sixths lengthwise

A handful of broccolini (around 8 stalks)

A handful of green beans, topped, tailed and halved

1 clove garlic, finely sliced

1 teaspoon sugar

1 tablespoon soy sauce or tamari if you prefer

Heat the oil in a wok or large frying pan.  Add the vegetables and stir fry for 4-5 minutes until just losing their rawness and gaining a little colour.  Put in the garlic and stir quickly so it doesn’t burn followed by the sugar and soy sauce.  Cook for a further minute stirring all the time and then serve.  This is enough for 2 with rice for lunch or 4 as a side.

Greens with garlic and soy 3


New Slaw

New Slaw 3

What happened to good old fashioned coleslaw?  I say good but actually, so many times it wasn’t, sometimes in fact it has been downright terrible.  Limp, greasy, over oniony, short on seasoning, cabbage too big, drowned in cheap mayo etc etc.  Poor coleslaw has hung its head in shame and hidden at the back of the buffet table.  Until now and talk about a makeover – the humble coleslaw has had some sort of sonic reinvention, spruced up and started wearing international couture.  Asian Slaw, Spicy Slaw, Citrus Slaw, Moroccan Slaw – it’s thrown off its dowdy mayo, lost the Cole and got down and funky with the kids.   Spicy, herby, tangy or hot – Slaw can be anything you like as long as it is crunchy.

I love a crunchy salad and regulars to these pages will know I am not stranger to this type of side.  My Christmas Salad (December 2013), the Thai-ish Salad (November 2015), Carrot Salad (January 2013) and of course the Celeriac Remoulade (January 2016) are variations on the slaw theme.   They are all cheap and easy to rustle up, happily retain their crunch for a couple of days in the fridge and will go with a myriad of other things as well as being perfect for lunch on their own (I particularly like this ones with a piece of cold salmon).  There is an added bonus though and its a huge and resounding boom of a bonus.  Children love them.   Who knew that getting raw veggies into children could ever be so easy?  My son particularly likes my Christmas Salad and regularly has if for his packed lunch.   My daughter however adores this gingery, piquant New Slaw the best, told me it is her favourite salad and had it three times this week.

Carrots, fennel, beetroot, cabbage (green, white or red), radish, celeriac, apple, broccoli – any of these work well.  Then do you want a sharp, zingy dressing, maybe spicy too?  Or perhaps a creamy dressing, a little more traditional although I favour yogurt or creme fraiche here over the ubiquitous mayo.  Add herbs, lots of them and seeds are good too.  Sometimes I add dried cranberries or raisins as I love that little burst of sweetness.  Customise your slaw as you please, make your own bespoke version.  We eat one of these raw, crunchy types of salad a few time a week and this one is the current favourite.  Gingery, herby and with a little heat it goes perfectly with barbecued chicken and I will post my favourite grilled chicken recipe in the next week or so.  Meanwhile may the crunch be with you, it is delicious and you can just feel it doing you good.

New Slaw

New Slaw

The other day I didn’t have any cabbage so used more carrots and it was just as good.  Different but just as good and that is the point of these slaws really, add a little more or less of something as you please, make it your own.

3 carrots, peeled

1/4 of a small red or green cabbage, core removed and finely chopped

6 radishes, sliced

2 spring onions, sliced

A thumb of ginger, peeled

1 red chilli, deseeded and finely chopped

A small packet of coriander

A small packet of mint

A handful of raisins or dried cranberries (optional)

2 tablespoons olive oil, a light one

Juice of 1 lime, you may need 2 depending on their size and juiciness.

Grate the carrots and put into a large bowl with the radishes, onions, cabbage and chilli.  I use a box grater for this rather than an attachment in the processor as I find using this makes the veggies really wet.  Finely grate the ginger, add this to the bowl along with the olive oil and lime juice.  Season and mix well with your hands so that everything is combined.  Chop or snip the herbs over the salad, add the raisins/cranberries if using, mix once more and serve to happy faces.