Easiest berry cheesecake (two ways)

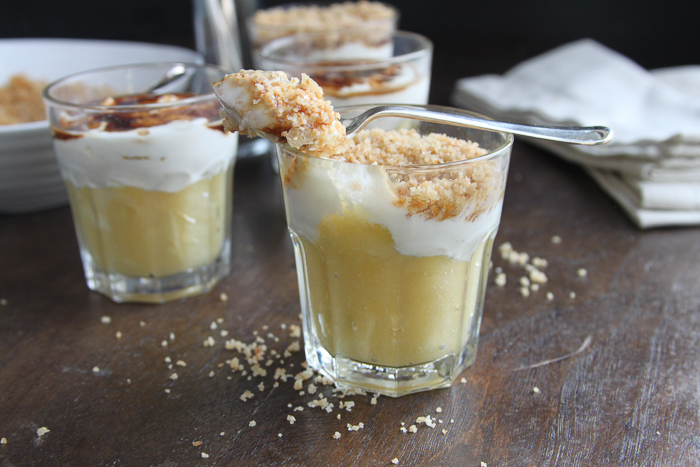
Searching for an easy summery pud?  Look no further.  This is a recipe that I have returned to time and again over the years and every time wonder why I don’t make it even more often.  So simple, fresh and delicious, a proper treat without weighing you down afterwards.  When it isn’t berry season I regularly turn to a jar of lemon curd and swirl that with the mascarpone/yogurt mix – the zip of lemon is bright and tangy and this also makes this even more a spur of the moment pudding.

If it is simply too hot to put on the oven you can just leave the biscuit base to set in the fridge or freezer for a while, it tastes just as good but isn’t quite as crisp or held together.  I have done both and have been happy regardless.  The creamy combination, whilst given silky richness by the mascarpone is still fresh and light from the addition of yogurt.

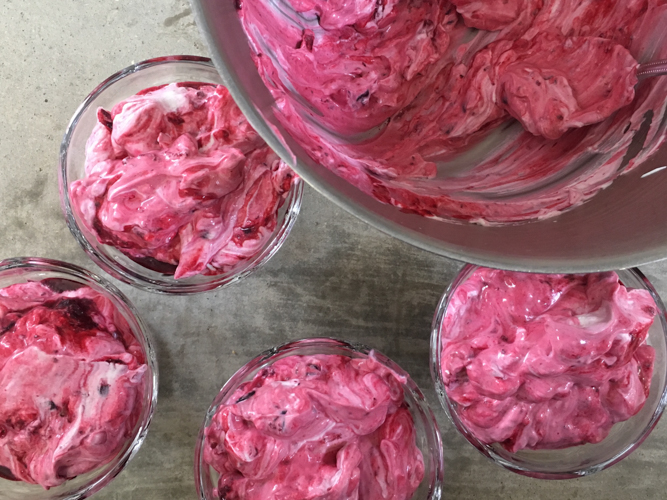
You can use any fruit you have to hand, here I used roughly a handful of raspberries and blueberries plus half a regular punnet of strawberries, some halved and some quartered.  On the off chance there is any left I suspect this would make rather a special breakfast.

Berry Cheesecake

Calling this a cheesecake may be a stretch, although tit does contain mascarpone, but happily here is no need for gelatine or baking it (bar the base if you want to).

Whilst the version you see here is fabulous for this time of year I would strongly urge you to try the lemon curd version – gently swirl half a jar of good lemon curd into the creamy mixture, don’t be too vigorous, the contrast of yellow and white is rather pleasing – and then spread this over the base.  You could finely grate some lemon zest on top if you wish.

250g digestives, broken into crumbs

120g melted butter

Pinch of salt

250g mascarpone

250g Greek yogurt (or Greek style)

50g icing sugar

400g approximately of berries or half a jar of lemon curd (see intro)

Preheat the oven to 180 (cooking is optional, see intro) and line the base of a 23cm springform tin.  Mix the digestive crumbs with the melted butter and salt and press into the tin.  Bake for 10 minutes then leave to completely cool (you can do this earlier in the day and keep in the fridge).  Mix the mascarpone, yogurt and sugar together, it will stiffen slightly which is fine (again you can do this ahead and store in the fridge).  Remove the biscuit base from the tin and then spread it with the creamy mixture.  Scatter over the berries and serve.  This could serve 8 but I would rather it served 6.


Bread in a pan

You will know I have been making bread for ages but usually bake my regular loaf in a tin or direct on the baking sheet.   My sourdough I cook in an enamel pan with a lid because Elaine from FoodbodSourdough, whose method I use, suggests this and as her method is the absolute business I see no reason to deviate.   Recently though I have started baking my regular white bread in a pan and I love it.

As you all see from the picture, the loaf develops such a fabulous, all round crust and looks incredible.  Couldn’t be easier, just heat the pot as you heat the oven and when both are ready, using oven gloves and extreme caution, put your dough in the pan.  I use a Le Creuset because that is what I have, sometimes they are called a Dutch Oven, and you can also use an earthenware pot with a lid or said enamel pan.  Bear in mind the oven has to get very hot so whatever you use must be able to withstand around 220 degrees.

This method is just so easy – no clattering in the cupboard looking for the right loaf pan, no anxiety about your ball of dough settling into more of a splat on a baking sheet (it’s happened…) just pop it in the pan and look forward to a crusty, beautifully risen loaf.

White Bread in a pan

It you have a stand mixer then this will take literally minutes of your time to rustle up.  Before I got ours though I still made this and happily kneaded it for around 10 minutes.  It is a calming way to spend 10 minutes (come on, it is only 10 minutes!) and you will be rewarded tenfold!

500g strong white bread flour

10g salt

10g dried yeast

1 tablespoon soft butter (optional)

300ml lukewarm water

Put the flour into a large bowl (or the bowl for your mixer) with the salt on one side and the yeast on the other.  Add the butter (if using) and water and bring it all together to form a sticky mess into a dough.  Then using the dough hook put your mixer on for 6-7 minutes or knead by hand for 10.  Sprinkle the inside of the bowl with a little extra flour, put the dough into the bowl, cover with a cloth and leave somewhere warm and draught free for an hour.  After this time you will see your dough has risen so gently punch the air out of it by kneading a couple of times then form it into a ball.  Put it onto a piece of floured baking paper, dust the top with flour and leave to rise for a further hour in a bowl or proving basket if you have one (covered).  Towards the end of this time preheat your oven to 220 and put your le Creuset or pot of choice in the oven to heat at the same time.  When ready to bake, USING OVEN GLOVES remove the pan from the oven, take off the lid and gently lower your dough into it, slash the top a couple of times, replace the lid and cook for 40 minutes by which time it should be perfectly bronzed.   Let it cool on a wire rack and then dig in.


Full of greens pancakes

I make masses of pancakes – regular sugar and lemon Shrove Tuesday ones, Scotch pancakes which for some reason we used to call Cold Feet, fat fluffy American pancakes and veggie ones.  Lots and lots of veggie pancakes.  Not only are they delicious but a great way of slipping extra veg into reluctant customers (my children) and to use up a glut – I must have made a 1000 courgette and feta type pancakes when we had a courgette glut a couple of years ago.

You can customise these according to what you have – I tend to use something a little starchy like the peas/broad beans or some cooked/canned pulses plus fresh veg such as broccoli or spinach along with any soft herbs I have.  At the moment wild garlic is going into lots of things as we have some growing here but otherwise a clove of garlic adds a gentle hum.  If you use courgette (and it is delicious) then grate it and squeeze out as much water as you can so the batter isn’t too wet.   Same with carrots and parsnips which benefit from grating and any excess water being removed.

I used a couple of spring onions that needed their last hurrah but you could use chives if that’s what you have.  Chunks of feta or cheddar work well and make these even more substantial.  You can add finely chopped chilli or a pinch of cayenne if everyone you are cooking for is receptive – I like to add my heat via a generous squirt of sriracha.

Incidentally these make a wonderful breakfast topped with a fried or poached egg and some Greek yogurt to which you’ve added a swirl of sriracha, just saying….

Veggie pancakes

Below are the quantities I used for the pancakes you see in the pictures.  As long as the amounts are roughly in line you can pretty much freestyle as you please.  A tin of sweetcorn also works if you don’t have any peas or pulses.  Add or subtract herbs depending on what you have and what you like – these pancakes are very flexible. If you don’t have any self raising you can use plain flour plus 1/2 teaspoon baking powder.

300g peas, blanched for 1 minute if frozen

1/2 head of broccoli, approximately 200g, chopped fairly small, core included

3 spring onions, finely chopped

Small handful of parsley

Small handful of wild garlic, entirely optional

2 eggs

200g self raising flour (see intro)

50g Greek yogurt, or regular plain yogurt

A little olive oil

Put everything except the oil into a food processor, season well and blend.  Leave a bit of texture, you don’t want it baby food smooth.  Heat a little oil in a large frying pan and add tablespoons of the batter, leave for a few minutes until turning golden on the bottom when you peek and then turn.  Cook for a few minutes on the other side and then keep warm while you cook the rest.  The above was enough for 4 for lunch with a salad.


Blackcurrant Fool

Well, here is a blast of summer.   I’ve made no secret of my feeling that a weekend lunch isn’t complete without a pudding and we’ve tucked into no end of rib sticking treats appropriate to the colder months of the year.  Golden syrup sponge, plum galette, apple crisp, raspberry larder pudding and a whole host of crumbles have made an appearance recently.  Poking around in the freezer last weekend however I found a bag of blackcurrants which I’d picked last year and had been languishing in the icy depths since then.  Whilst my surprise clearly illustrates that I am not one of those with a list detailing the exact contents of the freezer, the weight and when it was frozen etc – I was jolly pleased with my find.

Thawed and simmered briefly with sugar I mixed them with cream and yogurt and we delighted in that mouth puckering, tangy, fragrant hit that is unmistakably blackcurrant. Should you have any berries in your freezer I highly recommend making this or simply buy a bag of frozen berries – I use them all the time in the winter for various recipes.

Blackcurrant Fool

Don’t worry if you have a few less (or more) blackcurrants – a fool is pretty forgiving and 20/30g either way won’t make much difference.  Equally if you need to use a bit less cream or yogurt the end result will still be fruity and delicious.

500g blackcurrants

100g caster sugar

200g double cream

200g Greek yogurt

Simmer the blackcurrants for about 10 minutes with the sugar until the fruit has broken down and the juices have become syrupy, cool.   Whisk the cream until soft peaks hold, add the yogurt, mix again briefly and then swirl in the blackcurrants.  Combine as much as you want – I like to seem some seams of pure blackcurrant but it is up to you.  This served 4 with a bit left over for someones breakfast.


Cinnamon Buns

Sweet, squidgy, fragrant with spice – what’s not to love about a cinnamon bun?  As yet I haven’t met anyone who doesn’t weaken at the knees with the mention of a CB.  My children adore them and regularly make urgent requests for me to bake some.  There is no great secret to making these, bread flour rather than plain gives that fluffy soft dough which is then wrapped around a buttery, sugary cinnamon filling.   The final flourish of icing completes the picture and makes them pretty much perfection in our book.

So, whilst these are super easy to make remember to allow a bit of time.  Like other recipes using yeast it requires a couple of rises.  I give myself about a 4 hour time frame (which includes cooling them if you are going to ice them) but there isn’t more than about 30 minutes of hands on time.  Just letting you know in case you want to get them ready for the end of school….

Cinnamon Buns

I find a stand mixer easiest for this as it is quite a soft dough.

450g strong white bread flour

7g yeast

7g salt

60g soft brown sugar

1 teaspoon cinnamon

225ml milk, warmed to just blood temperature

1 egg beaten

75g soft butter, cubed

For the filling –

100g soft butter

80g soft brown sugar

2 heaped teaspoons cinnamon

200g Icing sugar

Put the flour, yeast, salt, 60g sugar and cinnamon into the bowl of your stand mixer.   Once mixing add the warm milk and beaten egg followed by the 75g soft butter, a bit at a time until it comes together then let this mix for 5 minutes.  Leave to rise for an hour in a warm, draught free place.   Roll the dough out on a floured surface until approximately the size of a tea towel then spread with the 100g soft butter.  Mix the 80g soft brown sugar and 2 teaspoons cinnamon together and then sprinkle this evenly over the butter.  Roll up from one of the long sides and then cut into even pieces about 2cm thick.  Depending on the length of your roll you’ll get about 12-16.  Place these cut side down and well spaced on a large baking sheet and leave to rise again for another hour.  Just before the time is up preheat the oven to 190 and then bake for 25-30 minutes until puffed up and golden.  Leave to cool.   Sift the icing sugar into a bowl and mix with just enough water to get the consistency you are happy with before trickling it over the buns either neatly and artistically or rather more erratically as I have done in the photograph above.


Apple and Raspberry Crumble

Apple and raspberry crumble 4

I can’t tell you how much I love a crumble.  Plum crumble, rhubarb crumble, apple and blackberry crumble, all of them have a place on my table.  Childhood weekend lunches often finished with a fabulous, fruity and crunchy crumble whilst apricot crumble at school was a thing to celebrate, the best pudding of all and something that made other school food worth living through.

All that said however, I hadn’t thought of giving you a crumble recipe here.  Not out of meanness you understand, rather I thought everyone had a good, reliable crumble recipe up their sleeve to be whipped out when required. It was only after being asked for this particular recipe six time in a couple of months that I began to wonder and so I present it to you now.  Soft tangy fruit under a blanket of oaty, sweet and buttery crumble, let me tell you the sum here far, far exceeds the total of its humble parts.

This particular incarnation is my absolutely favourite, the bee’s knees and the vicar’s you know whats.  Although a straightforward apple crumble is still something to sing about, the addition of raspberries lifts it, their fruity tang and fragrance make this wholly lip smacking and satisfying which surely is what a pud is all about.  Can I rave little more?  It is and easy and cheap to make, a perfect way to use up any apples looking a little tired and frozen raspberries are perfect here so regardless of the season this can be on your plate in around an hour, start to finish.

Apple and Raspberry Crumble

Ideally use a combination of cookers and eaters, the bramleys are the ones that cook down to a velvety apple puree whilst the eaters retain a little bite.  I say 7 tablespoons of sugar and water as this is usually about right but depending on the tartness of your apples you may need more sugar and add more water if you think it is required.  You can cook the apples and make the crumble ahead of time but don’t put the crumble onto the fruit until you are ready to cook it as it will get soggy, ideally keep it in the fridge.

1 kg apples (see introduction), peeled, cored and roughly chopped

7 tablespoons golden caster sugar

7 tablespoons water

200g plain flour

100g cold butter, cubed

1/4 teaspoon salt

80g golden caster sugar

40g oats

150g frozen raspberries

Preheat the oven to 190.  Put the apples, the 7 tablespoons of sugar and water in a pan and cook gently until the apples are soft and broken down, about 20-30 minutes.  You may need a little more water once cooked and taste in case you need a little more sugar.  Do keep the apples tart though as the crumble bring sweetness to the party.  Meanwhile either whizz the butter and flour in a processor until it resembles breadcrumbs or do this by hand then add the salt, sugar and oats.  Tip the cooked apples into a suitable oven proof dish, I tend to use an enamel one which is 29x23cm and add the raspberries to this, mixing so they are evenly distributed in the apples, no need to defrost.  Tumble over the crumble and smooth it gently but don’t pack it down.  Cook for around 30 minutes or until bubbling at the edges and just browning on top.  This serves 6 or better still 4 with lots of seconds, I like it with cold cream or custard whilst my children prefer vanilla ice cream.


Crunchy Apple Pudding

Crunchy Apple Pudding 3-2

I couldn’t countenance Sunday lunch without a pudding.  I fully admit there have been times when a quickly whisked together chocolate or butterscotch sauce to pour over good ice cream has been all I could muster but puddings they were nonetheless.  I love all manner of rib sticking, warming treats – after all Sunday lunch only comes around once a week and I will easily go days or the whole week without any other sweet, sticky number for afters.  Golden syrup sponge, lemon (or chocolate) surprise pudding, a fruit crumble, pie or galette – anything that will be delicious and only improved by cold cream or warm custard.

Last Sunday though I had rather gone to town with a main course of braised silverside and many, many vegetables.  So, although I had bought bramleys and had apple crumble with cream firmly, and fondly, in mind a bit of rejigging was in order.

Several years ago I was offered a pudding called Danish Peasant Girl in a Veil.  Seriously, that was the name – I am sure because I had to ask at least four times.  Caroline, who made it, assured me that just because I hadn’t heard of it didn’t mean it wasn’t a real dessert…  It was layers of apple puree, crispy breadcrumbs, whipped cream and grated chocolate and extremely good it was too.  It has sat filed in my memory until now.

I decided to combine the spirit of the Danish girl with an old nursery pudding of dark muscavado ‘melted’ on top of Greek yogurt which in turn covers some fruit.  So here we have it.  A lighter take or a (rather early) summer version of apple crumble with cream.  My husband and children loved it although I think I am the biggest fan.  Next time I am going to make more so I can also have it for breakfast.

Crunchy Apple Pudding 3

Crunchy Apple Pudding

I have given measurements but these are flexible, if your apples weigh 1kg then great, you will have a little more puree just adjust the sugar accordingly.  Likewise use more yogurt if you like, these are just guidelines.

750g bramley apples, cored, peeled and chopped

2 tablespoons sugar

2 tablespoons water

50g breadcrumbs

25g butter

1 heaped tablespoon demerara sugar

Good pinch of salt

1 heaped tablespoon dark muscavado

250g Greek yogurt

Put the apples, sugar and water in a pan and cook slowly until completely broken down.  Taste, you may need a touch more sugar depending on the sharpness of your apples.  Leave to cool.  Meanwhile melt the butter in a frying pan and add the breadcrumbs, sugar and a good pinch of salt.  Mad though it might seem you need the salt to give flavour so the crumbs don’t just taste sweet.  Fry these gently for 10 minutes, stirring occasionally until golden and crunchy then leave to cool.  Once you have all the components you can assemble your puddings.  Divide the apple between the glasses and top with the yogurt, sprinkle the muscavado between the four glasses and leave it for a few minutes to ‘melt’ then cover with breadcrumbs.  You can do more layers if you like, I am not dextrous enough to do many, neatly and I only want breadcrumbs on the top so they are really crunchy.  This makes enough for 4 glasses but is easily doubled.

Crunchy Apple Pudding 2

Cheddar is King

Barbers 1883 Steak

When it comes to cheese, Cheddar is King.  I feel some intakes of breath and raised eyebrows so let me explain.  I love cheese, absolutely adore the stuff.  Blue cheese, soft cheese, smelly cheese, holey cheese, hard cheese – you name it, it works for me.  If however and God forbid, I had to choose just one cheese then it would have to be cheddar and this is why.

Parmesan is fabulous – strong, salty and perfect grated on pasta, shaved over salads or in chunks after dinner with a perfect pear – but I don’t want it in a cheese and pickle sandwich.  Gorgonzola in a warm salad with mushrooms or melted over my onion tart tatin is splendid but I wouldn’t want it in my cauliflower cheese.  Sharp white feta – just the ticket in a Greek salad or my Feta and Spinach parcels but honestly has no place in a wobbly, fluffy cheese souffle.  Do you see where I am going with this?  All cheeses have their perfect place, some can even adapt to a couple of occasions but there is only one contender for the main prize, one that can do everything, the supreme all rounder – the mighty cheddar.

Sweet, tangy, nutty, salty it is just divine and a regular in my fridge.  In fact since I first set out into the big wide world and had to fend for myself I don’t think my shopping basket has ever been without it.   First few weeks in London – cheese on toast with Worcester sauce to remind me of Yorkshire Saturdays in front of the wrestling.  Studying for my city exams – cheese and pickle sandwiches for a week so as to have no cooking distraction.  Oh and when I say cheese in both these cases I do of course mean cheddar.

It is a saviour when I need to rustle up a packed lunch from a skeleton fridge or for a snack and I’m sure barely a week goes by without it being the main feature – cheese souffle, cauliflower cheese, Welsh rarebit, cheesy leeks on toast, a grand Saturday ploughmans or my daughters favourite, plain pasta with butter and cheese.

This then, is a new best friend.  A love child if you will from a grilled cheese sandwich and a steak sarnie.  The melty cheddar forms an alliance between the savoury, meaty juices and the sweet onion relish that has to be tasted to be believed.  That it is all incased in toasty, crisp bread is simply gilding the lily.  It is superb, it is supreme.  Just try it.

Barbers 1883 Steak 2

Barbers 1833 Cheddar and Steak Sandwich with Quick Onion Relish

You might want to add a handful of rocket or watercress to the sandwich for a little peppery bite, not that it needs it but you might like the greenery.

1 teaspoon butter

1 teaspoon olive oil

1 small onion (snooker ball size), chopped

1 heaped teaspoon dark brown sugar

1 teaspoon balsamic vinegar

1 steak, approx 250g

2 thick slices of good, rustic bread – a sourdough or similar

50g good strong cheddar, I used Barbers 1833, thinly sliced

Melt the butter and oil in a small frying pan, add the onion and a pinch of salt and cook slowly until soft, about 15 minutes.  Stir in the sugar, balsamic and a teaspoon of water and cook for another 15 minutes by which time you should have a sticky relish, taste it as you may need a drop or two more of balsamic.  Cook your steak how you like but rare to medium rare works best for this, then sprinkle with salt and leave to rest for at least 5 minutes.  Whilst it is resting preheat your grill to high, toast the bread and then divide the cheese between the two slices of toast and put under the grill until the cheese is melting.  Place your rested steak onto one slice of cheesy toast, spread over the onion relish and top with the remaining slice.  Cut in half and tuck in.

I recently attended the BBC Good Food Fair as a guest of Barbers1833 who kindly gave me some of their delicious cheddar which I used for this and several other recipes.  I was already a fan of their cheddar and regularly buy it from my local farmshop.  By the way, I have previously made my Cheese Sables with Rosemary Salt (December 2013) which rely on a belting cheddar, with Barbers1833 and they were amazing.

Cheese Biscuits 2