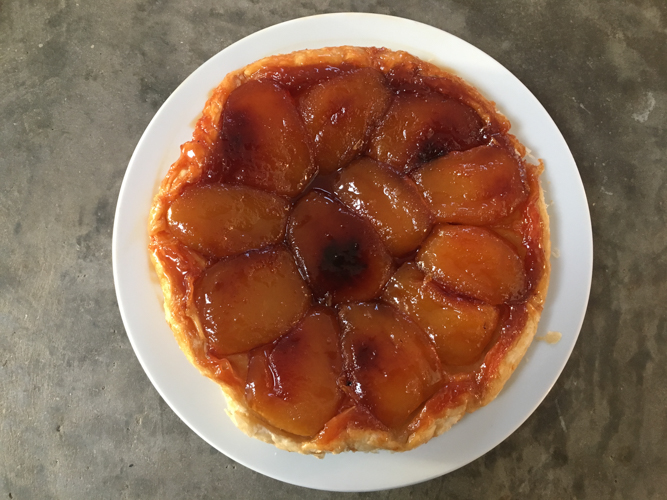
Savoy Cabbage with Pancetta and Creme Fraiche


When I was working in the City I had a supper that I enjoyed with almost obsessive regularity.  There are two reasons for this.  Firstly as I got up at 5.30am to get to work, there were no slow braises for me in the evening and secondly it had to be easy to shop for.  These days I think nothing of a wander around the shops, market and farmstall seeing what is in season and looks good.  Those days I was a single gal enjoying London and perusing the supermarket shelves at a weekend was just not happening.  A savoy cabbage which cuts neatly into 4;  those little duo packs of pancetta that have the perfect amount in each half, a large pot of creme fraiche and a good bunch of parsley were all I needed.  So you see, a short and snappy shopping list and I was set for a weeks worth of suppers.

Did I mind having the same thing every night?  No, not only for all the reasons above but mainly because it is so exceptionally delicious.  This dish has come back into play because adding a little bacon/pancetta, chorizo or similar often helps with my brassica phobic daughter and this is no exception.  Whilst she is still of course aware there is cabbage lurking in this dish, its inherent bitter edge is offset by the creme fraiche, salty savoury pancetta and the generous hit of parsley.

You can serve this with a stew (we had it yesterday with a pot roast of local silverside – heaven), it is perfect with a roast chicken and also works an absolute treat  with a piece of white fish.  Or do what I did all those years ago, enjoy it in solitary splendour (the cabbage that is, not you) it is a highly satisfying one pot supper.

Savoy Cabbage with Pancetta and Creme Fraiche

You can of course use smoky bacon, it is a matter of history that I use those little packs of pancetta although I have on occasion used a piece of pancetta when I can get hold of it.  The nutmeg adds a delicious note of its own making this taste rather like Carbonara with cabbage as my son described it.

65g (or thereabouts) chopped pancetta or bacon

1 teaspoon olive oil

1/2 small (or quarter of a large) savoy cabbage, chopped

1 tablespoon creme fraiche

1/2 small pack parsley, chopped

A little grated nutmeg

Salt and pepper

Heat the oil in a pan with the pancetta and cook done but not quite crispy.  Add the chopped cabbage and give it a good stir and let it begin to wilt.  Put a tablespoon of water into the pan, stir and put a lid on for 2 minutes.  Remove the lid, give it a good stir getting any bits of pancetta off the bottom, add the creme fraiche and a grating of nutmeg and black pepper.  You may need a little salt but taste it first as pancetta is salty.  Finally stir in the parsley and serve.  This is enough for 1 or two as a side but, clearly, easily doubled or tripled.


Yorkshire Puddings

I am very keen that the recipes I post here are useful to you.   They are usually quick and certainly easy, delicious and hopefully ones you will make a mental note to cook again and again.  At the same time I am a little wary of offering up recipes you may have made a million times or, worse, telling Granny how to suck eggs…..  This had presented me with something of a dilemma.  There are, of course,  recipes that I have struggled with but after much repetition, tinkering, trial and error I feel I’ve cracked – the question is has anyone else struggled with these so called classics and would you want said recipes?

What persuaded me to feature this Yorkshire Pudding recipe today is that I have a friend who struggles with them.  There are two reasons why this shouldn’t be the case, firstly she is an excellent baker, which after all is what you are doing here and secondly, she is from Yorkshire.  Both these reasons mean she should be able to whip up a batch of Yorkies without breaking a sweat and yet she tells me they continue to give her gip.

So here are they are, the Yorkshire puds I make.  I have tried many different recipes and styles to finally arrive at these.  I’ve used a blender for the batter and also mixed by hand.  The batter has been rested overnight in the fridge and also used immediately.  I’ve tried self raising and plain flour, honestly I’ve done my homework.   This is what works for me and I hope will work for you (and especially you Hayley).

Yorkshire Puddings

I usually give this batter about 20 minutes to rest, mainly because I need to find the muffin tin I cook them in, put the oil in, heat it etc.

200g plain flour

3 large eggs

300ml milk

1/2 teaspoon salt

Sunflower/vegetable oil

Preheat your oven to 210 and make sure a rack is in the top third.  Put the flour and salt into a bowl and whisk in the eggs one at a time followed by the milk a little at a time beating as you go.  If there are any lumps give it a really good whisk and this should get rid of them.  I now pour the batter into a jug as it is so much easier to then pour it into the muffin tin.  Put the oil into a 12 hole muffin tin, you need enough to cover the base of  each hole and put this into the oven to heat up for about 5 minutes.  Extremely carefully remove the tin from the oven and pour the batter into each hole.  Return to the oven and cook for 20-25 minutes.  Check after 15 as you may need to move the shelf down to the middle of the oven if they are browning too quickly.  This obviously makes 12 but its up to you how many it serves, we (as a family of 4) happily have 2 or 3 each…


Christmas

Christmas is such a fun yet hectic time and it is all to easy to get overwhelmed with to-do lists (I know this all too well!).  I have tried to help myself over the years by getting a few things made ahead and stashed away in the freezer and would refer you to some of the tips in my November 2013 post.   I’ve been a bit slow to follow my own advice this year but my Christmas day potatoes are par boiled and waiting for us in the icy depths of the freezer shortly to be followed by some Cheese Gougeres (November 2016) and Cheese Sables (December 2013) which are so handy to be able to whip out and serve with drinks along with the Spiced Cherries in Bacon (November 2013) you see in the picture above.

It wouldn’t be Christmas without a Buche de Noel (December 2014) and I do find it difficult to deviate from my Tiramisu version which we usually have for lunch on Christmas Eve – light yet rich enough to be a treat, creamy and boozy – it is delicious and, I promise, so easy.

A Chocolate Peppermint Tart would definitely not go amiss (December 2014) or perhaps a Chocolate Pudding Cake (December 2012) which you could make today and freeze if that makes life easier for you.

It is not just puddings around here and we won’t go more than a couple of days without a crunchy, fresh salad gracing the May table – two favourites at this time of the year are, appropriately enough my Christmas Salad (September 2013) – an absolute winner with cold meats or cheese, crunchy and full of flavour.  My other can’t-do-without salad right now is Celeriac Remoulade (January 2016) – this funny looking vegetable is pretty underrated but this salad is a knock out.

Finally, it wouldn’t be Christmas without mincemeat making an appearance and I find these Oaty Mincemeat Shortbreads (December 2015) the most delicious and easiest version of mince pies. A matter of minutes to rustle up a tray of them and they usually take about the same length of time to disappear.

I feel I’ve neglected these pages over the last few months due to a lot of building work and decorating going on.  I intend to be back in full force with an array of delicious, everyday family food to excite you with.  Happy Christmas and here’s to a fabulous New Year.


Plum Galette

There is a definite nip in the air this morning and I feel we are now fully enveloped in Autumn and the treats it brings.  There is bonfire night to look forward to which always reminds me of those when I was a child.  Nibbling enthusiastically on a toffee apple but shamefully becoming bored once past the sugar and faced with the apple.  Hot dogs which inevitably leaked ketchup onto my woolly gloves and the glowing face that comes from a huge bonfire.

It is then a speedy tumble towards Christmas but I don’t want to become distracted by this end of the year fiesta and rather enjoy now.  Frosty mornings which lead to sunny but cold days, leaves changing colour then falling and the sparse bleakness of the garden.  On the flip side there is sloe gin to be made and stashed away, fires to be lit and all those culinary delights that were cast aside somewhere around early April.  Stews, hearty gratins and bakes, crumbles and cobblers filled with all manner of orchard fruits.  Rib sticking food to keep out the cold and to enjoy around the table with family and friends as the daylight fades.

My previous recipe for a galette was a nectarine and cherry one (August 2013) and it seemed long overdue to offer a more autumnal version, this fits the bill perfectly.  Unlike that summer version which suggested using bought pastry for speed (summer holidays and all) this time I make the pastry but you should do whichever works for you (I won’t judge).  I have used plums here because I can’t resist their juicy tartness, the perfect foil to crisp sweet pastry but you can just as easily use a few crispy apples (eaters not cookers here) perhaps adding a little cinnamon along with the lemon juice.  We have enjoyed this two or three times over the last week or so, my children love it with ice cream, I prefer it with cold pouring cream but can’t help thinking a really good vanilla custard would probably bring the house down.

Plum Galette

The amount below is just right for the four of us, a generous quarter each but then none left winking at me from the counter begging me to finish it (for which I am grateful).  The one in the photograph is simply this amount doubled and it happily served seven.  You only need a teaspoon of beaten egg for the glaze so take it from another egg that is being cracked for another purpose if possible otherwise use milk.

100g plain flour plus a heaped teaspoon extra

60g cold butter, cubed or grated

A good pinch of fine salt

60g caster sugar, divided in two

30ml cold water

6 plums stoned and each cut into sixths

Squeeze of lemon juice

A teaspoon or so of beaten egg (see introduction)

A dessertspoon of demerara or caster sugar

Preheat the oven to 190.  Put the flour and butter into a medium size bowl and rub together with your fingers.  There isn’t really enough to justify getting a food processor out. When it looks like breadcrumbs add the salt and 30g of sugar followed by the water, bring it together into a ball, wrap in clingfilm and leave somewhere cool for half an hour.  Mix the plums with the teaspoon of flour, remaining 30g of sugar and a squeeze of lemon juice.   Roll out the flour to a rough 30cm circle and place on a parchment lined baking sheet, tumble the plums onto the pastry leaving a good gap and turn this pastry edge over the plums.  Brush with your glaze, egg or milk and sprinkle with the dessertspoon of sugar.  Bake for 25-30 minutes until golden brown on top and crisp underneath.


Greens with garlic and soy

Greens with garlic and soy

I have a feeling these greens could be magic.  My daughter really doesn’t like broccoli, in fact she has an aversion to most green veggies, however not only will she happily help herself to these without encouragement (bribery) but will have seconds.  Unbelievable.  I’ve mentioned before that its one of my life’s works to find a way my children will enjoy all, or most, vegetables and this is one of those successes.   I imagine the garlic and soy sauce go a long way towards making these so ridiculously delicious.  Whatever it is, I maximise the advantage and these are served regularly at my table alongside all manner of stir fries or anything with an Asian note.

Quick, healthy, cheap, delicious – what is not to like about this dish.  I am happy to tuck into these for a lone lunch and indeed ate, or rather greedily scoffed, the greens you see in the picture for lunch today.   A side of rice would have worked well to soak up the delicious sauce but I didn’t even get round to that.   We had something like this at Wagamama and loved the simplicity and crunch so couldn’t wait to have a go making it myself.  I suspect the original may have some additional ingredients but I couldn’t suss them and regardless love the pared down ingredients in the recipe below as much as the flavour.  You could add a pinch of chilli flakes if you want or a squirt of Sriracha to the greens but honestly, they don’t need it.

Greens with Garlic and Soy

Use any crunchy greens that catch your eye.  I always use broccolini and pak choi as that was what I had first had.  This time I’ve added the last of the green beans from the garden and you could use regular broccoli if that is what you have.   Going completely off piste, carrots work well in this application although they take longer to lose their raw crunch so bear this in mind before you add the garlic and soy.  Just thought you should know.

1 tablespoon oil

1 head of pak choi cut into sixths lengthwise

A handful of broccolini (around 8 stalks)

A handful of green beans, topped, tailed and halved

1 clove garlic, finely sliced

1 teaspoon sugar

1 tablespoon soy sauce or tamari if you prefer

Heat the oil in a wok or large frying pan.  Add the vegetables and stir fry for 4-5 minutes until just losing their rawness and gaining a little colour.  Put in the garlic and stir quickly so it doesn’t burn followed by the sugar and soy sauce.  Cook for a further minute stirring all the time and then serve.  This is enough for 2 with rice for lunch or 4 as a side.

Greens with garlic and soy 3


Pasta with Bacon, Garlic, Chilli and Parsley

pasta with bacon garlic chilli and parsley


We have had masses of building work done over the summer, hence my silence on these pages.  Some days I had a kitchen to use, other days not so much.  Once the Aga was decommissioned I moved onto a two ring gas hob (no oven) and once that was a goner it was braais or picnics.  There have certainly been some stressful moments and I have deposited more money in the swear box than I care to think about.  My poor husband and children have had to put up with a lot of unusual suppers from a rather mad-eyed cook but it was worth it and we now have a fabulous new kitchen.

The thing about being put on the spot kit wise is that it really focuses the mind.  If all the gadgetry has been boxed up (or just covered in dust) and there is only a pan to hand then one must make do.  One such recipe that came into play was this pasta with bacon, garlic, chilli and parsley.  Comprising of store cupboard and garden ingredients this can be reliably whipped up with the minimum of equipment, time or energy.  On one occasion I also added a pile of halved cherry tomatoes because I had some that needed using up.  It is certainly just as good without and I wouldn’t use tasteless winter (or jetset) tomatoes for the sake of it.

I highly recommend making this whether you are enjoying building works or not – it is cheap, very cheerful and everyone, particularly the children love it – what could be better (apart from a new kitchen).

Pasta with bacon, garlic, chilli and parsley

As with many of my recipes this is open to interpretation – if you adore bacon then add more;  if your children can’t bear chilli then leave it out.  The parsley is very much an ingredient here rather than merely a garnish but if the green stuff horrifies your little ones……

6 good fat rashers of smoked streaky bacon

2 large cloves of garlic

1/4 teaspoon dried chilli flakes

1/2 bunch parsley

300g pasta of your choice

Olive oil

Get your pasta cooking in a large pan of generously salted water.   Put a tablespoon of oil in a large frying pan and snip (I find scissors easiest here) the bacon into it.  Cook until just turning crispy then add the garlic and chilli, stir it around over a gentle heat ensuring the garlic doesn’t brown.  When the pasta is done, drain it retaining a little of the cooking water.  Tumble the pasta into the frying pan and mix well with the bacon, garlic and chilli adding a splash or two of cooking water to keep the whole thing quite slippery.  Chop the parsley over the top, season well and serve with parmesan if you like.  This amount is enough for two adults and two children.

Summer eating

Stawberry Mivvi

The garden is demanding much of my time.  With this crazy combination of belting sun followed by pouring rain the weeds in particular are flourishing.  Encouragingly though all the other goodies I have planted are also thriving and we are already enjoying radishes, lettuces and peas.  The first of the beans are nearly big enough to pick and various salad leaves make it to the table most evenings.

What with all this horticultural activity, a couple of busy weeks judging and lots of visitors my recipe writing has had to take a back seat.  It’s not that I don’t have any ideas up my sleeve, on the contrary my head is buzzing with new things to do with this seasons fabulous produce.  We are coming to that time of year when we are truly spoilt and very little needs to be done to show off new vegetables and berries to their max.   Simply I haven’t had time to write any of my new recipes down or photograph them.  So forgive me if I take this opportunity to remind you of a few favourites, the recipes for which you’ll find on these pages, of what we are enjoying at the moment.

Above you’ll see the Mighty Strawberry Mivvi, (June 2014) an enormous version of that old childhood favourite ice lolly the Cornish Strawberry Mivvi.  This is one of my son’s favourite puddings and as he had been away for a few days last week I made it to greet him on his return.  He has nearly worked his way though it.

Anna May everyday Tomato bruschetta

This bruschetta finds its way onto our tables at least once a week.  British tomatoes are now available and along with some good bread, sourdough being my choice, this makes a sublime starter or lunch.  You will feel like you are holiday.  Tomato Bruschetta (July 2013).    One of my absolute favourite puddings is pannacotta, not only deeply delicious but also a doddle to make and perfect for entertaining.  Of the three you will find here in the archives it is the vanilla version, served with blackcurrants (July 2014) that is the absolute winner.

Vanilla pannacotta 2

For barbecues I would recommend this Fresh Herb Sauce (July 2013), totally lip smacking and the perfect accompaniment to meat, fish or veggies.  I served it as the dressing for a tomato salad the other day, there wasn’t any left….  I couldn’t mention summer eating without one of my salads, either the Roast Vegetables with Pomegranate Molasses (July 2014) or Roast Aubergine, Feta and Mint salad (July 2015), easy, quick and delicious.  Of course you might also need some Quick Pickled Onions to go with all this too (August 2014), and if you happen to have any cherries or nectarines knocking around I can’t think of any better use for them than this galette (August 2013)

Anna May everyday Nectarine and Cherry Tart

Whatever you are doing, home or away, on holiday or still at school, enjoy some fabulous summer treats and I will be back next month with new ideas to hopefully tempt you.


Iced buns

iced buns-2

When I went to collect my son from a friends’ house the other day I took some iced buns I’d just made as a thank you.   On handing them to the father he took a whiff and started rhapsodising about iced buns he’d had as treat when young and we merrily reminisced about trips to the bakers as children.   It seems the iced bun has been around for a long time (remember those in the Railway Children on Bobby’s birthday?), stood the test of time and is pretty much loved by everyone.

Essentially just a bread roll, sometimes sweetened, sometimes with raisins but always finished off with a slick of white icing.   I’m all for children having treats but as some of the offerings in the shops seem so full of sugar, preservatives or other suspect ingredients, I would rather make my own and know what is going into the treats (and my children).   These buns are so plain I can live with the small amount of icing on each one.

I make these on a regular basis and realising how popular they are thought I should share the recipe with you quick sharp.  Fantastically easy, the only requirement when making them is to allow a bit of time for the dough to rise.

This recipe uses my regular plain white bread recipe (March 2016) but you could ramp these up by using the slightly richer dough of my Milk Loaf (July 2014).  As often as not I will use half the dough to make a small loaf and the rest to make iced buns (or indeed any small rolls/flatbreads/pizzas etc you may need).  Half the dough will yield around 12 small finger buns but of course you can make fewer, bigger ones – simply extend the cooking time a little.

Incidentally, the friends father asked for Cinnamon buns next time…..

iced buns 2

White bread for a loaf or Iced Buns

It you have a stand mixer then this dough will take literally minutes of your time to rustle up.  Before I got ours though I still made and happily kneaded it for around 10 minutes.  It is a calming way to spend 10 minutes (come on, it is only 10 minutes!) and you will be rewarded tenfold!  I haven’t specified the amount of icing sugar because it really depends on how many buns you make.  Put some in a bowl, cautiously add a few drops of water, you don’t need much and then mix hard.

500g strong white bread flour

10g salt

10g dried yeast

300ml lukewarm water

Icing sugar

Put the flour into a large bowl (or the bowl for your mixer) with the salt on one side and the yeast on the other.  Add the water and bring it all together from a sticky mess into a dough.  Then using the dough hook put your mixer on for 6-7 minutes or knead by hand for 10.  Sprinkle the inside of the bowl with a little extra flour, put the dough into the bowl, cover with a cloth and leave somewhere warm and draught free for an hour.  After this time you will see your dough has risen so punch the air out of it by kneading a couple of times then either split it in two if you want to make a loaf and buns or just make a load of buns.  Take small balls of dough and roll them to form a sausage shape.  Place on a flour dusted baking sheet.  Form the remaining ball into a loaf shape and place on another flour dusted baking sheet.   Cover again and leave for a further hour.  Towards the end of this time preheat your oven to 200.  Bake the rolls for 10-15 minutes depending on size until they are bronzed on the top and bottom, the loaf will take around 20-25 and sound hollow when you cautiously tap the bottom.  Let them cool on a wire rack, the rolls need to be completely cool so the icing doesn’t run straight off them.  Mix up icing sugar with a few drops of hot water until you get the desired consistency and ice the top of the buns.   Serve to very happy faces.

iced buns 3

Spaghetti with sundried tomatoes

sundried tomato pasta

Recently I felt I may have overdone the wild garlic and as my hand hovered over a bunch the other day to make more pesto I decided to take another direction for lunch.  Pasta was already on the menu in some guise, being so quick and cheap and popular with 75% of my family (the remaining 25% was out for the day).  It was just necessary to have a rifle around the fridge to see what could go with it.

I have mixed feelings about sundried tomatoes – in the right context they can be knock out, conveying their deep intense flavour with some force.  By the same token they can overpower other ingredients, be a little shouty if you know what I mean.  The answer I find is to let them shine, be the main star (have no one to argue with) and so it is in this pasta dish.  Utterly simple, super quick and really plate lickingly good.  I’m not sure you could call it a pesto, devoid as it is of pine nuts, basil and parmesan (that comes later) but it is very much that style of sauce which coats pasta but doesn’t drown it.

As you will see below, this takes a matter of minutes to make, literally less time than the pasta will take to cook.  A great little number to add to your quick and easy repertoire.

Sundried Tomato Pasta

I have also tried adding a few black olives.    This brings it more into tapenade territory but if you particularly like olives they make a punchy and flavourful addition.

8 sundried tomatoes

15g parsley, plus a little extra to sprinkle over before serving

1 small clove garlic

1 tablespoon olive oil

1/4 teaspoon chilli flakes

Salt and pepper

300g linguine or spaghetti

Parmesan to serve

Put the pasta on to cook.  Place the sundried tomatoes, parsley, garlic, oil and chilli flakes into a mini blender and pulse (alternatively put them all into a jug and use a hand blender).  You don’t want it entirely smooth, a bit of texture is good.  Taste for seasoning and add a little more chilli if you want or oil if it needs loosening.   When the pasta is cooked, drain and then add the sauce.  Mix well and serve sprinkled with the reserved parsley and with parmesan if you so wish.  Enough for two adults and two children.

Why do I write?

cookbooks

I have been asked (occasionally by myself) why I endlessly try out new recipes, spend half my time in the kitchen and write this blog.  There are several reason but the fundamental ones remain the same.  For the first I refer you to the About page above.  It describes how as life changes so what we need from our kitchen and cookbooks also changes.  From supper parties for my London crowd, through feeding my babies/children and on to now – still cooking for my family (honestly my raison d’etre) but also cooking up a storm for friends and their children which I love to do.   I needed recipes for all these situations and despite a mountain of cookbooks there were recipes missing so I decided to come up with my own.   That I was then the first to offer a suggestion when friends asked for ideas on what to cook for tea/lunch/supper/dinner etc prompted them to ask me to put them all in writing somewhere.

Also, I have never been keen on “kids” food and was (possibly blindly) determined that my babes would, as soon as practical, eat the same as us.  Partly because from an early age they would eye what we were eating with far more enthusiasm than their pureed veg so it made sense to give them a taste from our plates, encouraging their palates to happily experience new flavours.  Also for ease.  I want us to sit around a table together every day laughing, chatting, shouting, arguing (the latter two in a good way obviously) but primarily eating the same thing.  My experience has shown that giving into demands for the same food on a loop causes problems when the customer is presented with something new or unfamiliar….  Anyway, this is how I try and do it – not without its problems of course.  Whilst my daughter will eat anything (but ideally meat and potatoes) my son is a little more particular (his ideal being hummus and tomatoes).  It drives me a slightly mad but I continue in my merry way, put a variety of things (old and new) on the table and hope for the best.  The point is food is such a fabulous part of life and I would like my children to try everything*, have a healthy and happy approach to food and also to be able to cook, to feed themselves when the time comes.

One more reason springs to mind.  In the picture above you see some of the collection of books in which I write my recipes.  Scribbled as I cook, endlessly splattered with food, marked by crossings out and additions.  Some dishes never make it beyond these pages but many are eaten on a regular basis in our house.  So I had some dreamy idea of handing over the fabled book of recipes to each of my children when the dreaded day comes that they leave home.  Handing it over like the baton of life.  Huh, said another voice in my head, what if neither of them wants it and hands it back to you, you’ll feel a right fool.  Thus the obvious answer was to put it all onto a blog, this way they could dip into it whenever they pleased, cook things they love and have grown up eating but I would never know if they didn’t….


*This has backfired on me, in my quest that nothing is off limits, to be open minded and everything deserves a taste I have had to buy both pot noodles and pop tarts.  Once.