Greens with garlic and soy

Greens with garlic and soy

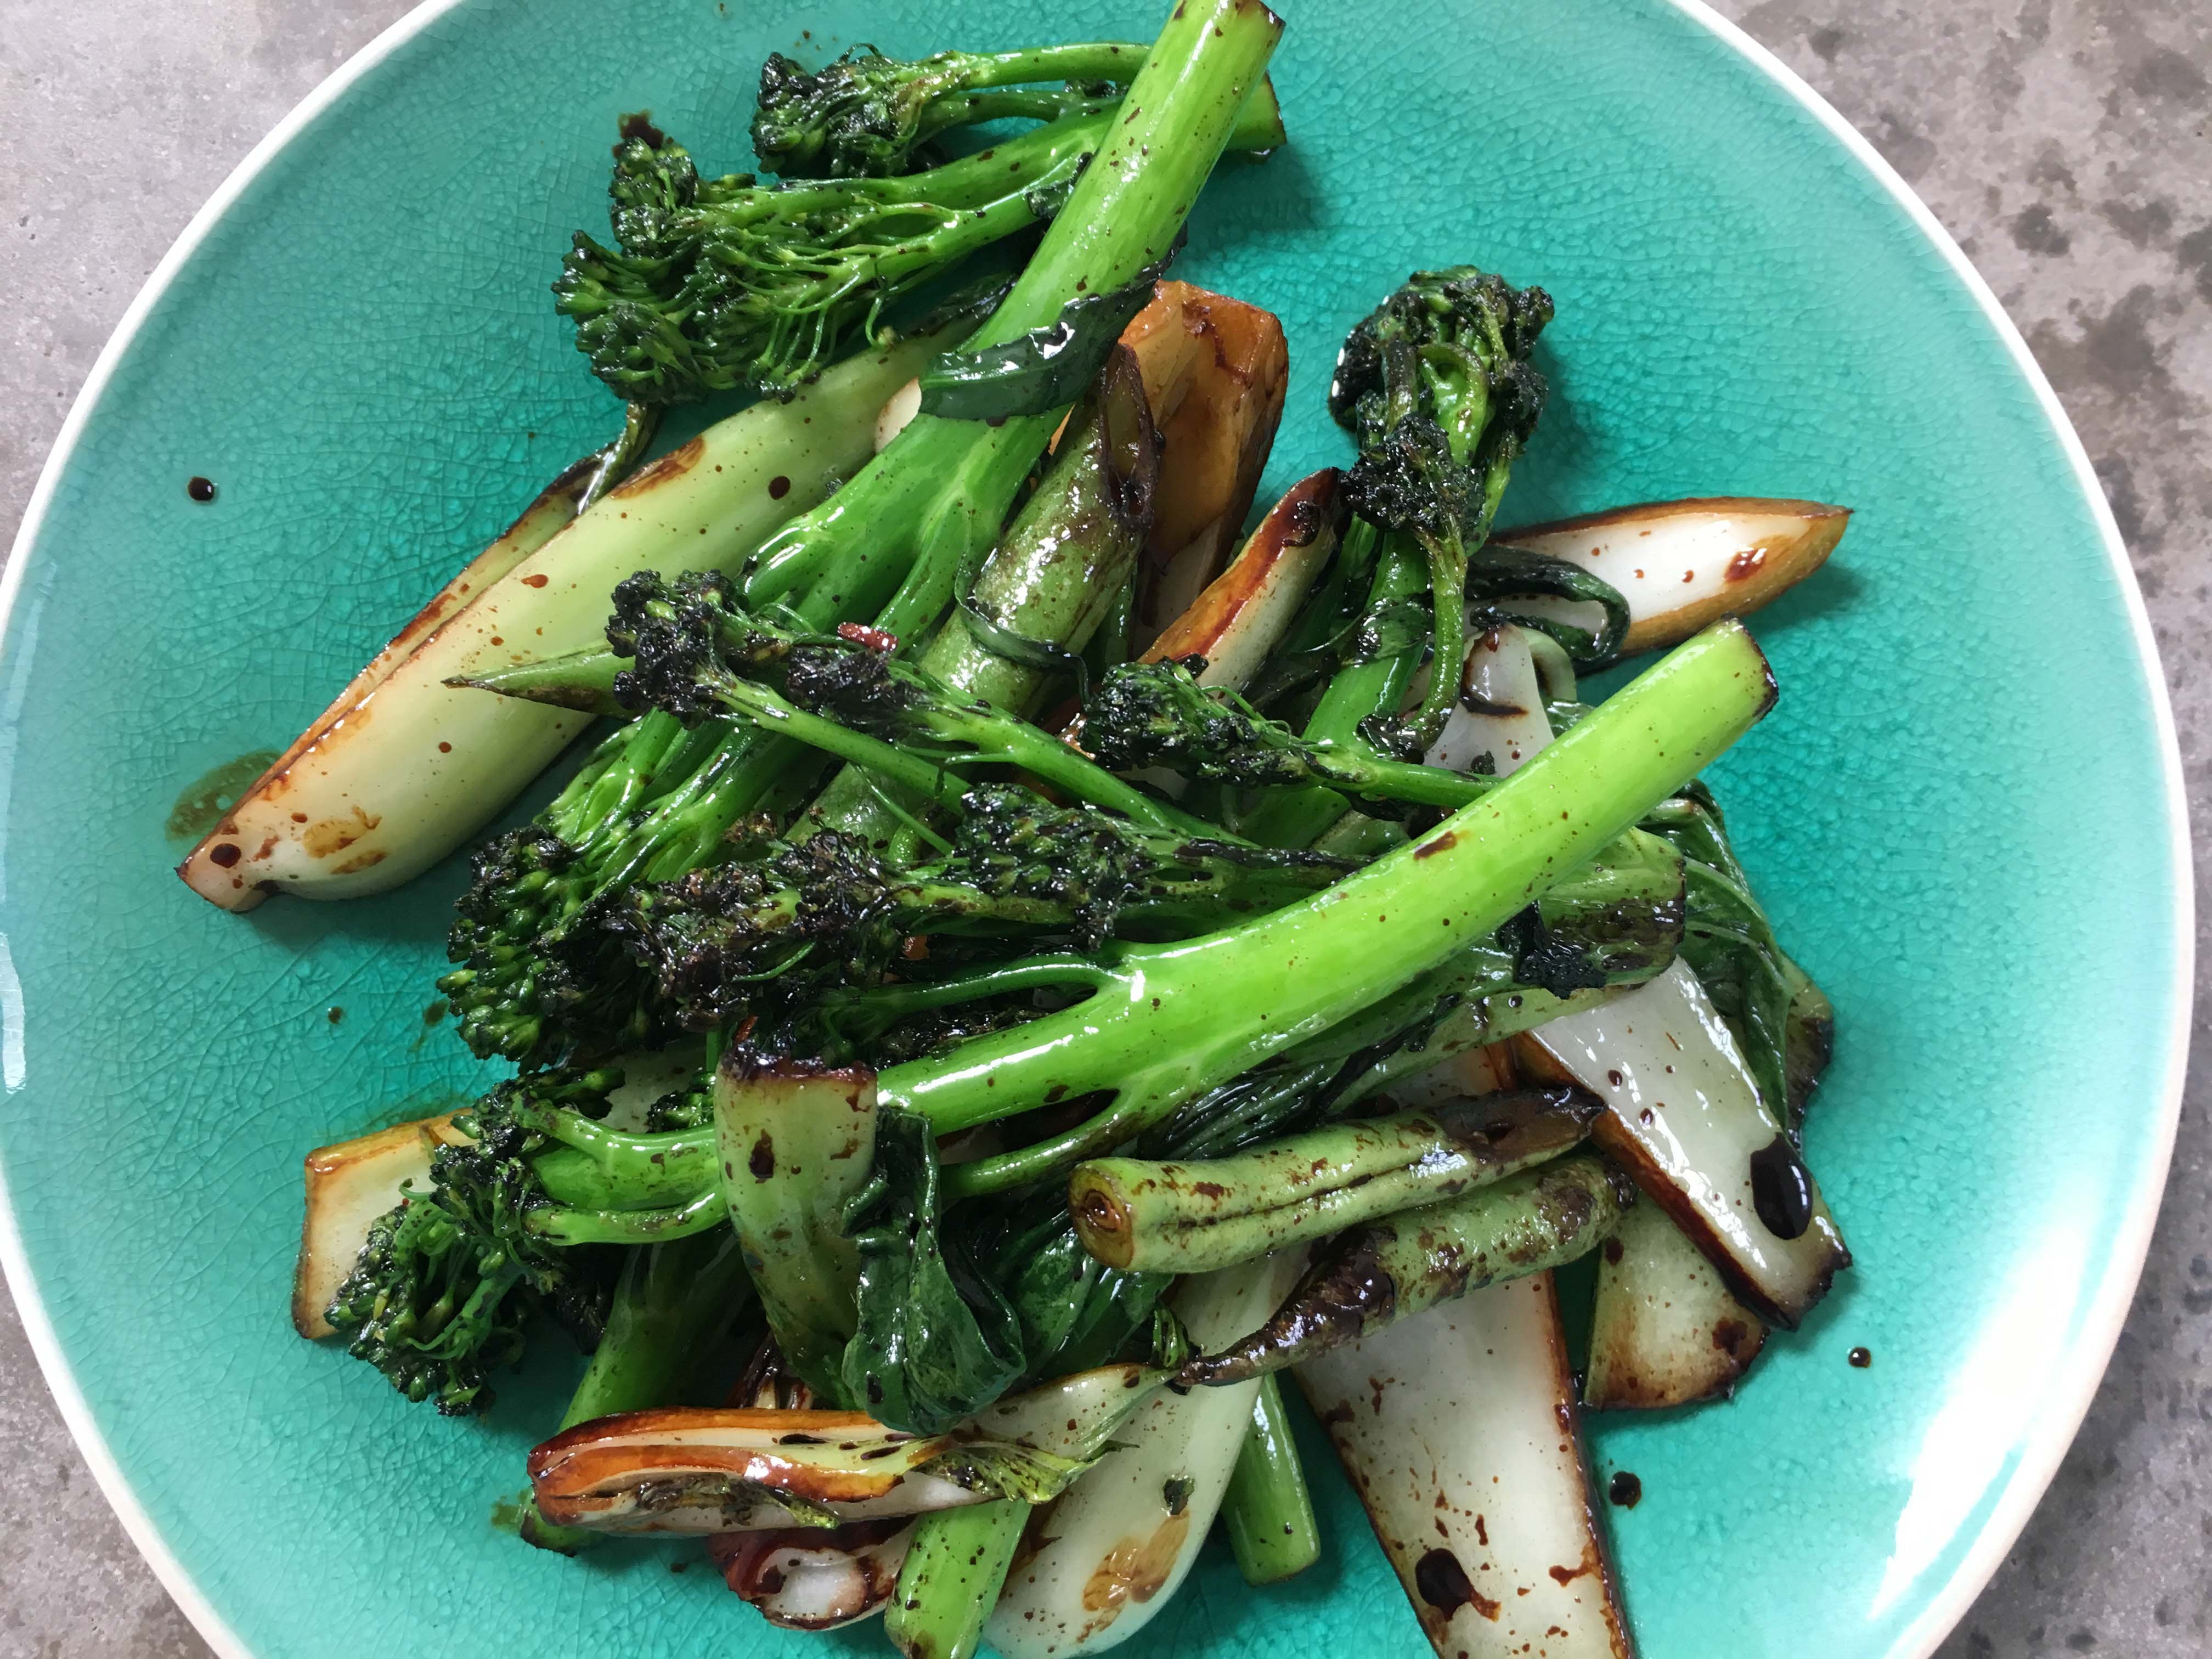
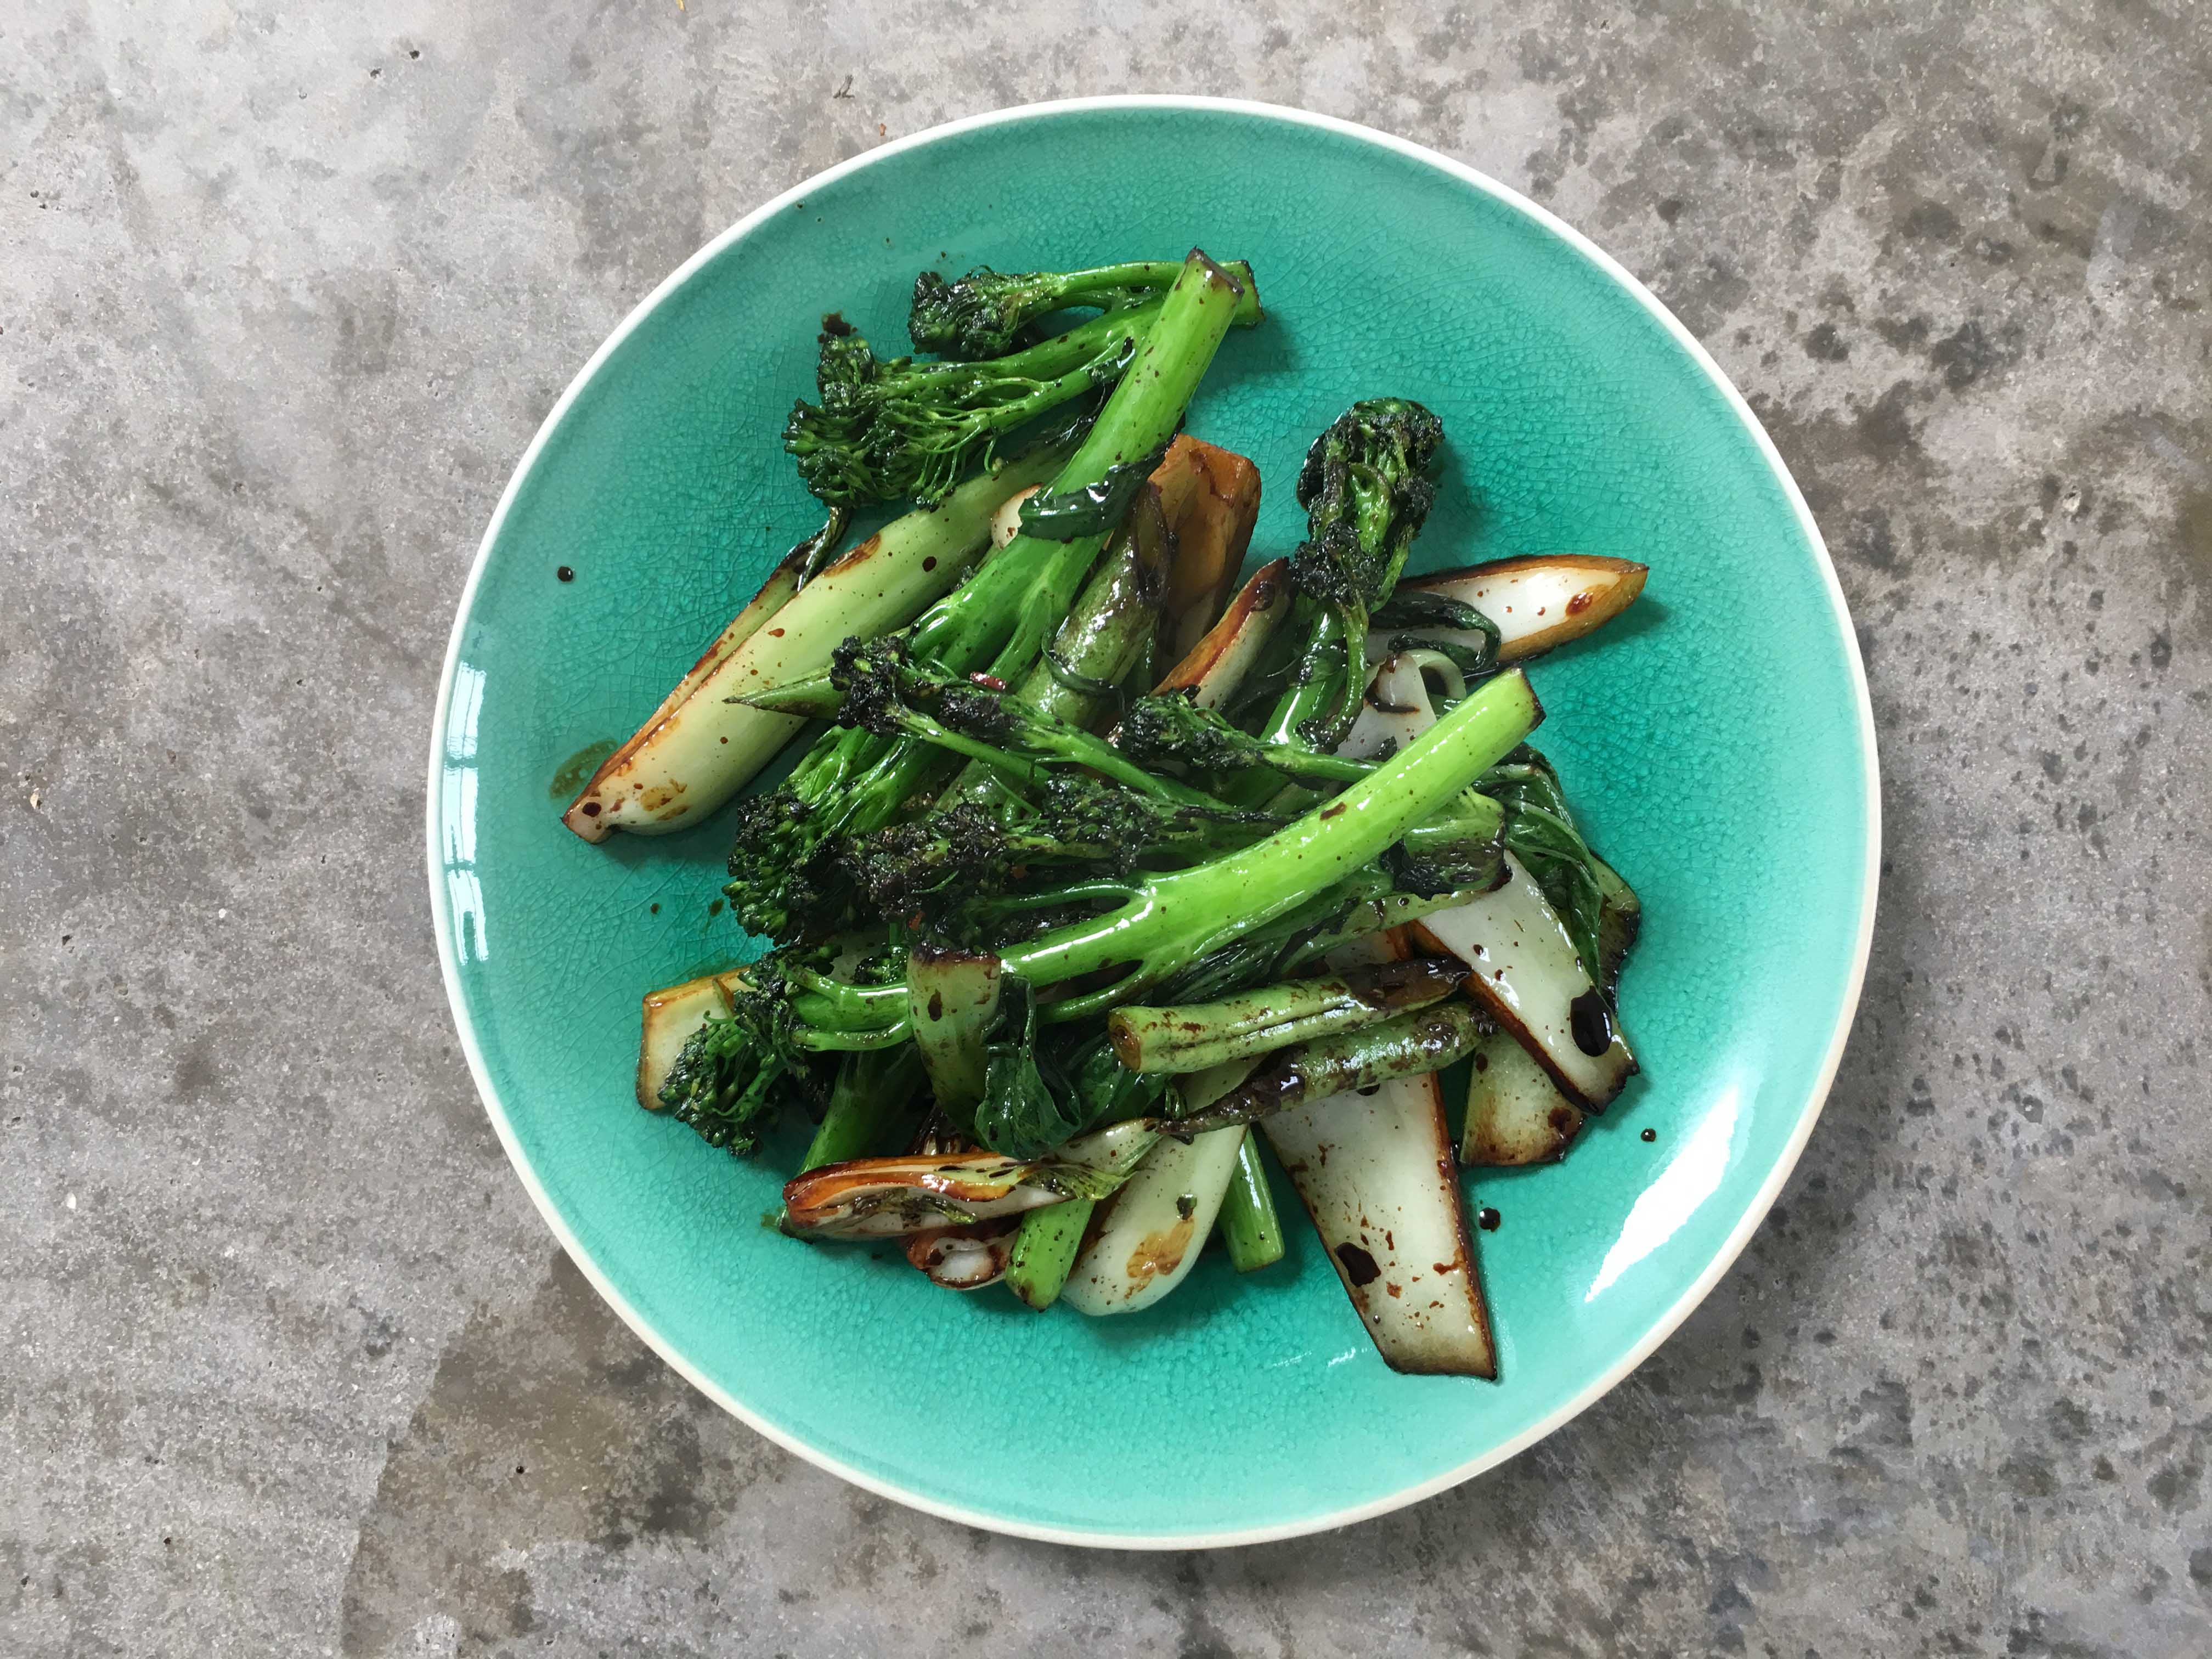
I have a feeling these greens could be magic.  My daughter really doesn’t like broccoli, in fact she has an aversion to most green veggies, however not only will she happily help herself to these without encouragement (bribery) but will have seconds.  Unbelievable.  I’ve mentioned before that its one of my life’s works to find a way my children will enjoy all, or most, vegetables and this is one of those successes.   I imagine the garlic and soy sauce go a long way towards making these so ridiculously delicious.  Whatever it is, I maximise the advantage and these are served regularly at my table alongside all manner of stir fries or anything with an Asian note.

Quick, healthy, cheap, delicious – what is not to like about this dish.  I am happy to tuck into these for a lone lunch and indeed ate, or rather greedily scoffed, the greens you see in the picture for lunch today.   A side of rice would have worked well to soak up the delicious sauce but I didn’t even get round to that.   We had something like this at Wagamama and loved the simplicity and crunch so couldn’t wait to have a go making it myself.  I suspect the original may have some additional ingredients but I couldn’t suss them and regardless love the pared down ingredients in the recipe below as much as the flavour.  You could add a pinch of chilli flakes if you want or a squirt of Sriracha to the greens but honestly, they don’t need it.

Greens with Garlic and Soy

Use any crunchy greens that catch your eye.  I always use broccolini and pak choi as that was what I had first had.  This time I’ve added the last of the green beans from the garden and you could use regular broccoli if that is what you have.   Going completely off piste, carrots work well in this application although they take longer to lose their raw crunch so bear this in mind before you add the garlic and soy.  Just thought you should know.

1 tablespoon oil

1 head of pak choi cut into sixths lengthwise

A handful of broccolini (around 8 stalks)

A handful of green beans, topped, tailed and halved

1 clove garlic, finely sliced

1 teaspoon sugar

1 tablespoon soy sauce or tamari if you prefer

Heat the oil in a wok or large frying pan.  Add the vegetables and stir fry for 4-5 minutes until just losing their rawness and gaining a little colour.  Put in the garlic and stir quickly so it doesn’t burn followed by the sugar and soy sauce.  Cook for a further minute stirring all the time and then serve.  This is enough for 2 with rice for lunch or 4 as a side.

Greens with garlic and soy 3


Pasta with Bacon, Garlic, Chilli and Parsley

pasta with bacon garlic chilli and parsley


We have had masses of building work done over the summer, hence my silence on these pages.  Some days I had a kitchen to use, other days not so much.  Once the Aga was decommissioned I moved onto a two ring gas hob (no oven) and once that was a goner it was braais or picnics.  There have certainly been some stressful moments and I have deposited more money in the swear box than I care to think about.  My poor husband and children have had to put up with a lot of unusual suppers from a rather mad-eyed cook but it was worth it and we now have a fabulous new kitchen.

The thing about being put on the spot kit wise is that it really focuses the mind.  If all the gadgetry has been boxed up (or just covered in dust) and there is only a pan to hand then one must make do.  One such recipe that came into play was this pasta with bacon, garlic, chilli and parsley.  Comprising of store cupboard and garden ingredients this can be reliably whipped up with the minimum of equipment, time or energy.  On one occasion I also added a pile of halved cherry tomatoes because I had some that needed using up.  It is certainly just as good without and I wouldn’t use tasteless winter (or jetset) tomatoes for the sake of it.

I highly recommend making this whether you are enjoying building works or not – it is cheap, very cheerful and everyone, particularly the children love it – what could be better (apart from a new kitchen).

Pasta with bacon, garlic, chilli and parsley

As with many of my recipes this is open to interpretation – if you adore bacon then add more;  if your children can’t bear chilli then leave it out.  The parsley is very much an ingredient here rather than merely a garnish but if the green stuff horrifies your little ones……

6 good fat rashers of smoked streaky bacon

2 large cloves of garlic

1/4 teaspoon dried chilli flakes

1/2 bunch parsley

300g pasta of your choice

Olive oil

Get your pasta cooking in a large pan of generously salted water.   Put a tablespoon of oil in a large frying pan and snip (I find scissors easiest here) the bacon into it.  Cook until just turning crispy then add the garlic and chilli, stir it around over a gentle heat ensuring the garlic doesn’t brown.  When the pasta is done, drain it retaining a little of the cooking water.  Tumble the pasta into the frying pan and mix well with the bacon, garlic and chilli adding a splash or two of cooking water to keep the whole thing quite slippery.  Chop the parsley over the top, season well and serve with parmesan if you like.  This amount is enough for two adults and two children.

Camp Fajitas

camp fajitas 2

I only have to hear Van McCoy’s The Hustle and I am transported back to Yorkshire that hot summer of 1976.  The fair came to our local town, Ripon and one evening, as a treat, we went to check it out.  The market square was full dodgems, waltzers and even a big wheel.  The air was heady with excitement, the music and the residual heat of the day.  Girls in their cheesecloth tops and cut off jeans hot pants and the boys watchful with their James Hunt hairdo’s and a packet of JPS tucked casually into capped t shirt sleeves.   The memory stays with me and reminds me of that long dusty hot summer with the school holidays reaching ahead for weeks. Without any internet or electronic games we had to amuse ourselves and there was a lot of playing in the garden, den building, making camps followed by general milling around.

These summer holidays have started off promisingly warm and I am keen for my children to fill their time as I did, mucking about outside, splashing in the river and climbing trees.  One way I’ve found to keep them busy is to get them to cook and campfire cooking has got to be up there as the best kind.  Even the most bored or bolshy child desperate to get onto their phone can usually be tempted by the thrill of the fire and ensuing feast.

These fajitas are perfect for a camp cook out, a doddle to make and seem to keep everyone happy.   You can cut up the vegetables and chicken or depending on their age, get your little darlings to do it for you, I am all for a bit of delegation/child labour.  We made the flatbreads you see in the picture and they could not be easier but by all means buy some if that is a step too far.   Much to my childrens’ disapproval I like to add lettuce to my wraps and if you are particularly carb-phobic you could dispense with the bread all together and fold your chicken and peppers into a large lettuce leaf.

camp fajitas

There are all manner of goodies you can add to your wraps.  I don’t add too much chilli when cooking to keep these family friendly so a drop of two of sriracha is mandatory for me and we always have sour cream or greek yogurt.   I might make a chunky guacamole or my quick pickled onions (August 2014) which add fabulous crunch and tang – the point is that the children love making these to their own specifications.  If you make the bread dough first then this can rise whilst you get on with the chicken and vegetables.  I use my usual bread recipe but on this occasion it only needs one rise before rolling them out.  If you are dong these on a camp fire I find a paella pan or large frying pan the best option.  Cook the filling first then put it on a plate to one side whilst you cook the flatbreads, they only take a few minutes each and this way you can use just one pan.

Camp Fajitas

2 tablespoons olive oil

2 large onions, peeled and sliced

3 large peppers, cored and sliced

2 large cloves of garlic, peeled and sliced

2 large chicken breasts, sliced into fairly small pieces

1 teaspoon cumin

1 teaspoon paprika

A pinch of cayenne pepper (more if you want it a little more spicy)

Salt and pepper

500g strong white bread flour plus a bit extra for rolling out

10g fast action yeast

10g fine salt

300ml lukewarm water

Mix the flour, yeast and salt with the water and combine to a dough.  If you are at home and have a stand mixer use this otherwise knead by hand for about 10 minutes then leave the dough covered for an hour to prove.  Put the oil into your large pan (see intro) and cook the onions and peppers with a good pinch of salt over a medium heat until soft, probably around 20 minutes.  Towards the end of this time add the garlic and cook for a few minutes.  Put the peppers and onions on a plate and cook the chicken in the same pan, you shouldn’t need anymore oil but add a bit if necessary.  Once golden add the spices and a pinch of salt, cook for a few more minutes then add around 100ml of water to create a bit of sauce, check for seasoning.  Put all this onto the plate with the peppers and onions and wipe the pan with a bit of kitchen roll but don’t bother washing it.

Take balls of the bread dough about the size of a satsuma and roll out in a little flour until the size of a large side plate.  Keeping the pan on the heat cook these for a couple of minutes either side until slightly puffed up and browning at the edges.  Put each flatbread into a folded tea towel to keep warm and soft while you do the rest  – you should get about 8 to 10.   Bung the filling back into the pan if it needs warming through and then tuck in along with any extra bits and pieces you have decided on (see intro).


Beetroot and Carrot Cake

Beetroot and Carrot Cake 2

My children have exceptionally finely tuned radars when it comes to trying out new dishes and show particular suspicion if I ever respond “it’s a surprise!” when they are faced with something new.  They will fire questions about ingredients at me but I am used to this now and have a range of ripostes and distracting tactics at the ready.  I’ve perfected acting in a slightly deaf, vague fashion when being cross examined, sometimes I will deflect questions by posing a conundrum so complex, lengthy and bizarre back at them that they will have forgotten their original question or my absolute favourite when faced with a query I would rather not answer, I look intently at the window and ask “is that a badger out there?”.

These discussions and my slippery evasiveness usually come to the fore when a less than popular vegetable has been snuck into something under cover.  I do this in my never-ending efforts to find a way to make each and every vegetable delicious to my treasures.  Rather as it was with this Beetroot and Carrot cake.  Previously a regular kind of Carrot cake had been deemed acceptable so grabbing this particular baton, I decided to expand on the idea and add beetroot to the mix.

Now don’t misunderstand me, I am under no false illusion that by adding any old veg to a cake it miraculously becomes healthy.  There is a sea of treats out there that contain ‘better for you’ ingredients – sweet potatoes, date syrup, wholemeal flour, quinoa or whatever but treats they are.  A cake is a cake is a cake, something to enjoy occasionally but not every day.  The reason I make this one is because I think it is absolutely delicious.  The fact that it contains grated raw carrot and beetroot is a happy coincidence.

My son ate one slice of the first of these cakes but has mysteriously been full whenever offered a slice at a later date.  My husband said he like it but could see why the children didn’t which, in itself, was fairly damning and my daughter simply eyed it as one would a snake.

So to everyone who has tried this cake and loved it (even those who were told the pink bits were raspberries….) I say thank you and to my family I say, never mind, all the more for me.

Beetroot and Carrot Cake 1

Beetroot and Carrot Cake

Grating the vegetables in a processor can make it a bit wet so I tend to do it by hand with a box grater, it only takes a few minutes.

300g carrots and beetroot (untrimmed or peeled weight), grated

250g self raising flour

2 teaspoons baking powder

Pinch of salt

150g soft brown sugar

1/4 teaspoon ground cinnamon

150ml sunflower or vegetable oil, plus a tiny bit extra for greasing the tin

2 eggs, beaten

125g icing sugar, sifted

50g soft butter

200g cream cheese, at room temperature

1 lime, zest and juice.

Preheat the oven to 170 and oil a 20cm tin with a little of the sunflower/vegetable oil and line the base.   Sift the flour, baking powder and cinnamon into a bowl, add the salt and sugar followed by the grated carrot and beetroot and mix well.  Combine the oil and beaten egg and add this to the flour and vegetables and mix.  It will be a thick mixture!  Put into the tin, level the top and bake for 1 hour or until a skewer comes out clean.  Leave to cool in the tin for 10 minutes before cooling completely on a rack.   Meanwhile for the icing, beat the butter, sugar and lime really well before adding the cream cheese.  It is important that this is at room temperature so it mixes in easily, don’t over beat it as it will quickly become runny.  If it does however, don’t panic, just put it in the fridge until firmed up.  Spread over the cake.

Orzo with Bacon, Tomato and Cream Sauce

Orzo with bacon and tomato

This is a winner.  A little girl (aged 3) recently came to stay and when it came to teatime she wasn’t in the mood for any nonsense.  I was fairly confident she would like this as my children adore it, even my son who is absolutely not the first to request pasta, ever.

When  the time came to serve though, I realised I had forgotten the vagaries of young children and must admit, felt a brief tremor of nerves.  Hurrah, it was a huge success and she polished off three helpings much to the panic of my daughter who was eyeing the reducing seconds in the pan with alarm.

So offer this with confidence and not only to children, I make no secret of loving it and am often to be caught sneaking a spoonful or two from the pan before it disappears.

Orzo with Bacon, Tomato and Cream Sauce

Orzo is a rice shaped pasta we have a particular fondness for but use any small shape you like. I keep those little rectangular packs of pancetta in the fridge and along with some small packs of passata in the larder this becomes an almost store cupboard supper.

125g orzo

1 teaspoon olive oil

100g pancetta, pack sizes vary and a little more won’t hurt if that is what you have

1 clove garlic, finely chopped

100g passata

2 tablespoons cream

A few sprigs of parsley, chopped

Parmesan

Cook the orzo according to the packet instructions, probably around 11 minutes.  Meanwhile put the pancetta into a large frying pan with a teaspoon of olive oil and cook until well coloured and crispy in places.  Add the garlic and cook for a minute before adding the passata, stir and cook for a few minutes before adding the cream.   Drain the pasta retaining a little of the cooking water.  Put the pasta into the sauce, stir until combined adding a little of the cooking water if you need it to loosen the sauce.  Grate over some parmesan, add the chopped parsley and serve with more parmesan to hand.  Serves two adults or three children.


Roast Cauliflower and other vegetables

Roast Cauliflower 2

I heard something absolutely extraordinary last week.  Whilst tucking into tea, my daughter stated the previously unimaginable “I love kale”.  I stopped talking and sat slack jawed in amazement.  This is the child that will shy away from vegetables apart from a grudging tolerance for peas and cooked carrots.  This the child who would normally show wide eyed panic in the face of anything cabbagy and try distracting tactics when I am dishing out.  Yet here she was and here it was – kale.   Now kale is one of the tougher and if we are honest more bitter winter leaves and so this particular entente was all the more surprising.  What was the magic, what was the secret alchemy you ask.  One of the oldest tricks in the book, a bit of olive oil, a sprinkle of salt and a brief sojourn in a hot oven.  That is all it takes to transform these frilly green leaves into a salty, savoury snack comparable (if not better) to the finest potato crisps.

The thing is I really want my children to like vegetables, I don’t want those stand off scenarios where I insist that vegetables are good for them while they will sit, mulish and resistant, eyeing me as one who wishes to enforce horror.  So I make it my goal to make their veggies more palatable, whatever it takes, I will keep trying different sauces, salsas and cooking methods until I have cracked it.

Roast Cauliflower

Cauliflower along with cous cous were two things my son had asked me, in all honesty, why God had invented.  He couldn’t bear either of them, couldn’t see their point and so some time ago having tried all other routes I thought to roast cauliflower.  What do you know they will now clamour over the last little floret and I can’t blame them, the oil, salt and hot oven trick turns these innocent little white sprigs into gold singed, roasty delicious mouthfuls.

These are not just something I serve to children and in fact the cauliflower in this form with the dipping sauce is a great choice to put on the table at the beginning of supper or to add to a tapas style spread.  The green sauce is my Fresh Herb Sauce (July 2013).

Roast Cauliflower

The addition of some chilli flakes to the cauliflower before roasting gives a lovely pop of heat but I generally don’t add them when doing this for children.  I have previously given the recipe for kale crisps, essentially just tear the leaves into mouthful size, turn in a little olive oil, spread out onto a baking sheet, sprinkle with salt and cook at 200 for about 7-10 minutes, turning once or twice and eyeing them like a hawk so they don’t burn.

1 medium size cauliflower

2 tablespoons olive oil

Sea salt

Preheat the oven to 200.  Trim the cauliflower , break into small florets and spread onto a baking sheet.  Pour over the oil and turn the cauliflower really well making sure every bit is coated in oil.  Sprinkle with salt and roast for 20-25 minutes until it is just turning golden brown and catching slightly at the edges.  Cool for a minute or two and taste, you might want a tiny bit more salt then serve with the green herby sauce.

Roast Cauliflower 3