Brown Sugar Meringue Cake with Blackberries and Lemon Cream

Blackberry and Lemon meringue 2

It feels as if autumn may be rapping her chilly fingers on the door.  There was a frost this morning and a proper mist coming up off the river.  Whilst I am not ready to immediately dive headlong into winter stews and duvets of syrup puddings I am certainly happy to wrap up a little and enjoy the cool air and changes in the landscape.  Leaves are turning bronze and starting to flutter down into crunchy piles demanding to be kicked, cobwebs in the hedges are highlighted by the frosty dew and birds are collecting, swooping and considering a winter in the sun.  Relish these September days, before you know it we will be hearing about Hallowe’en and Christmas.

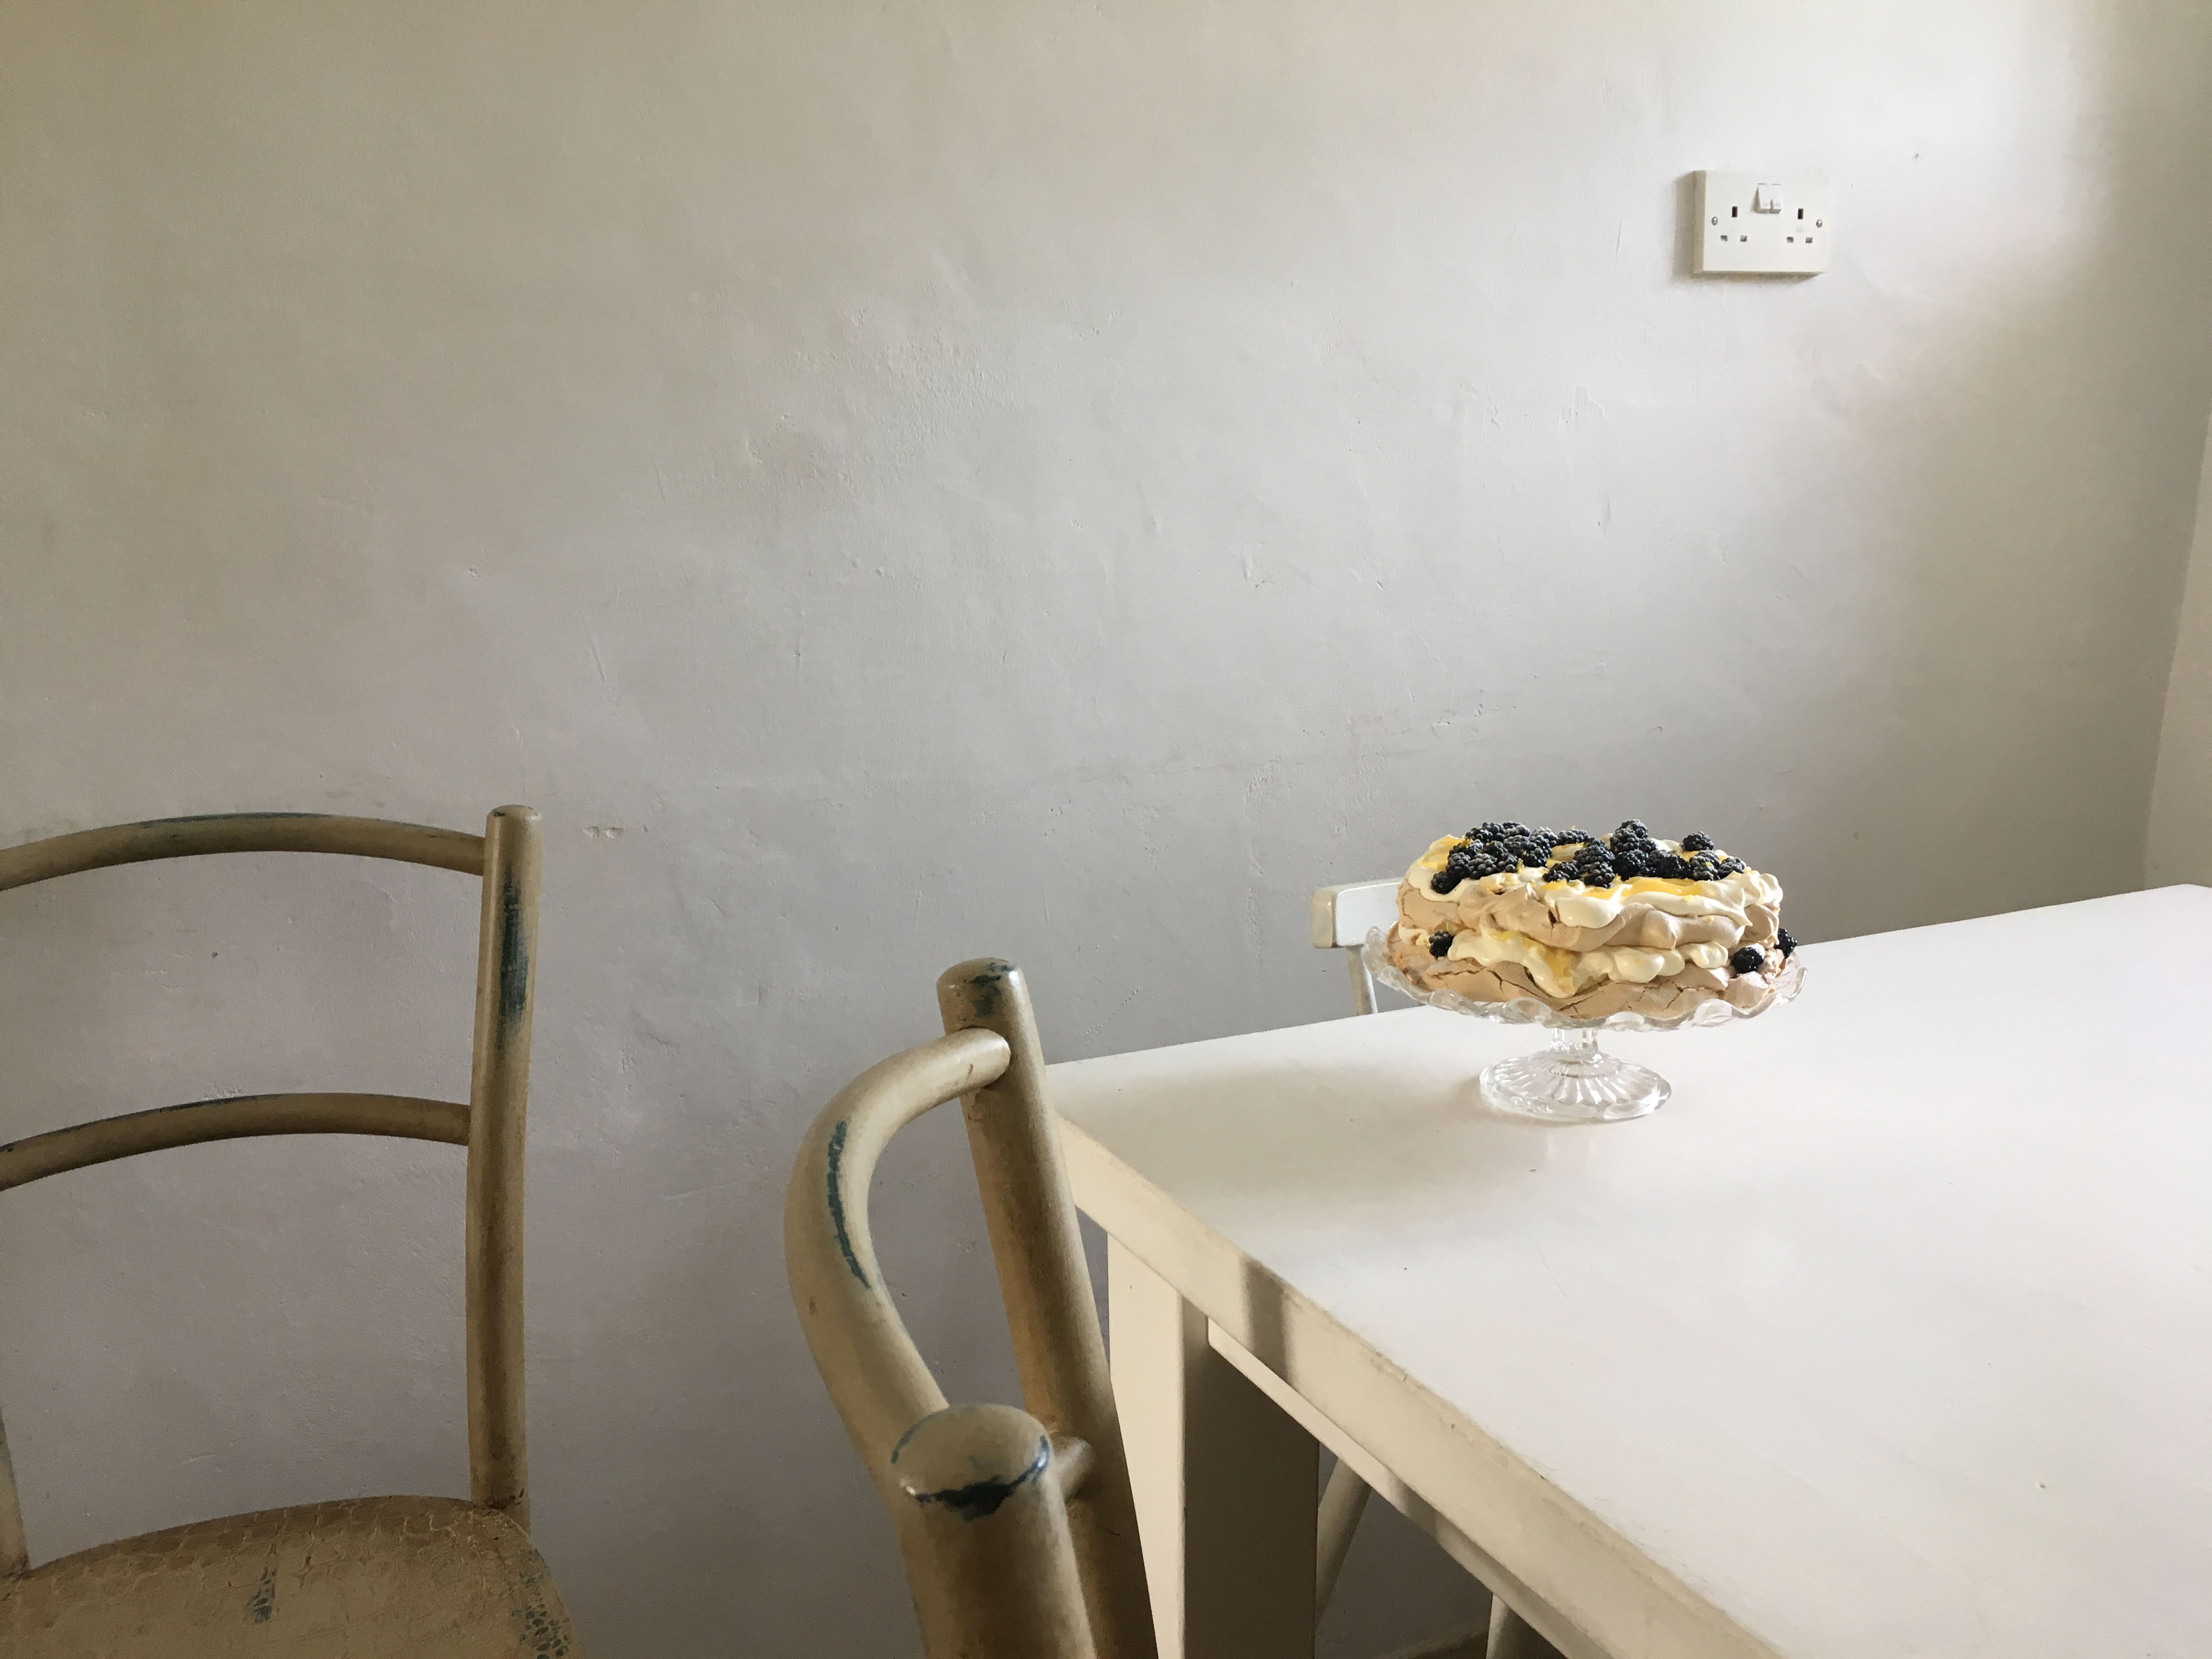
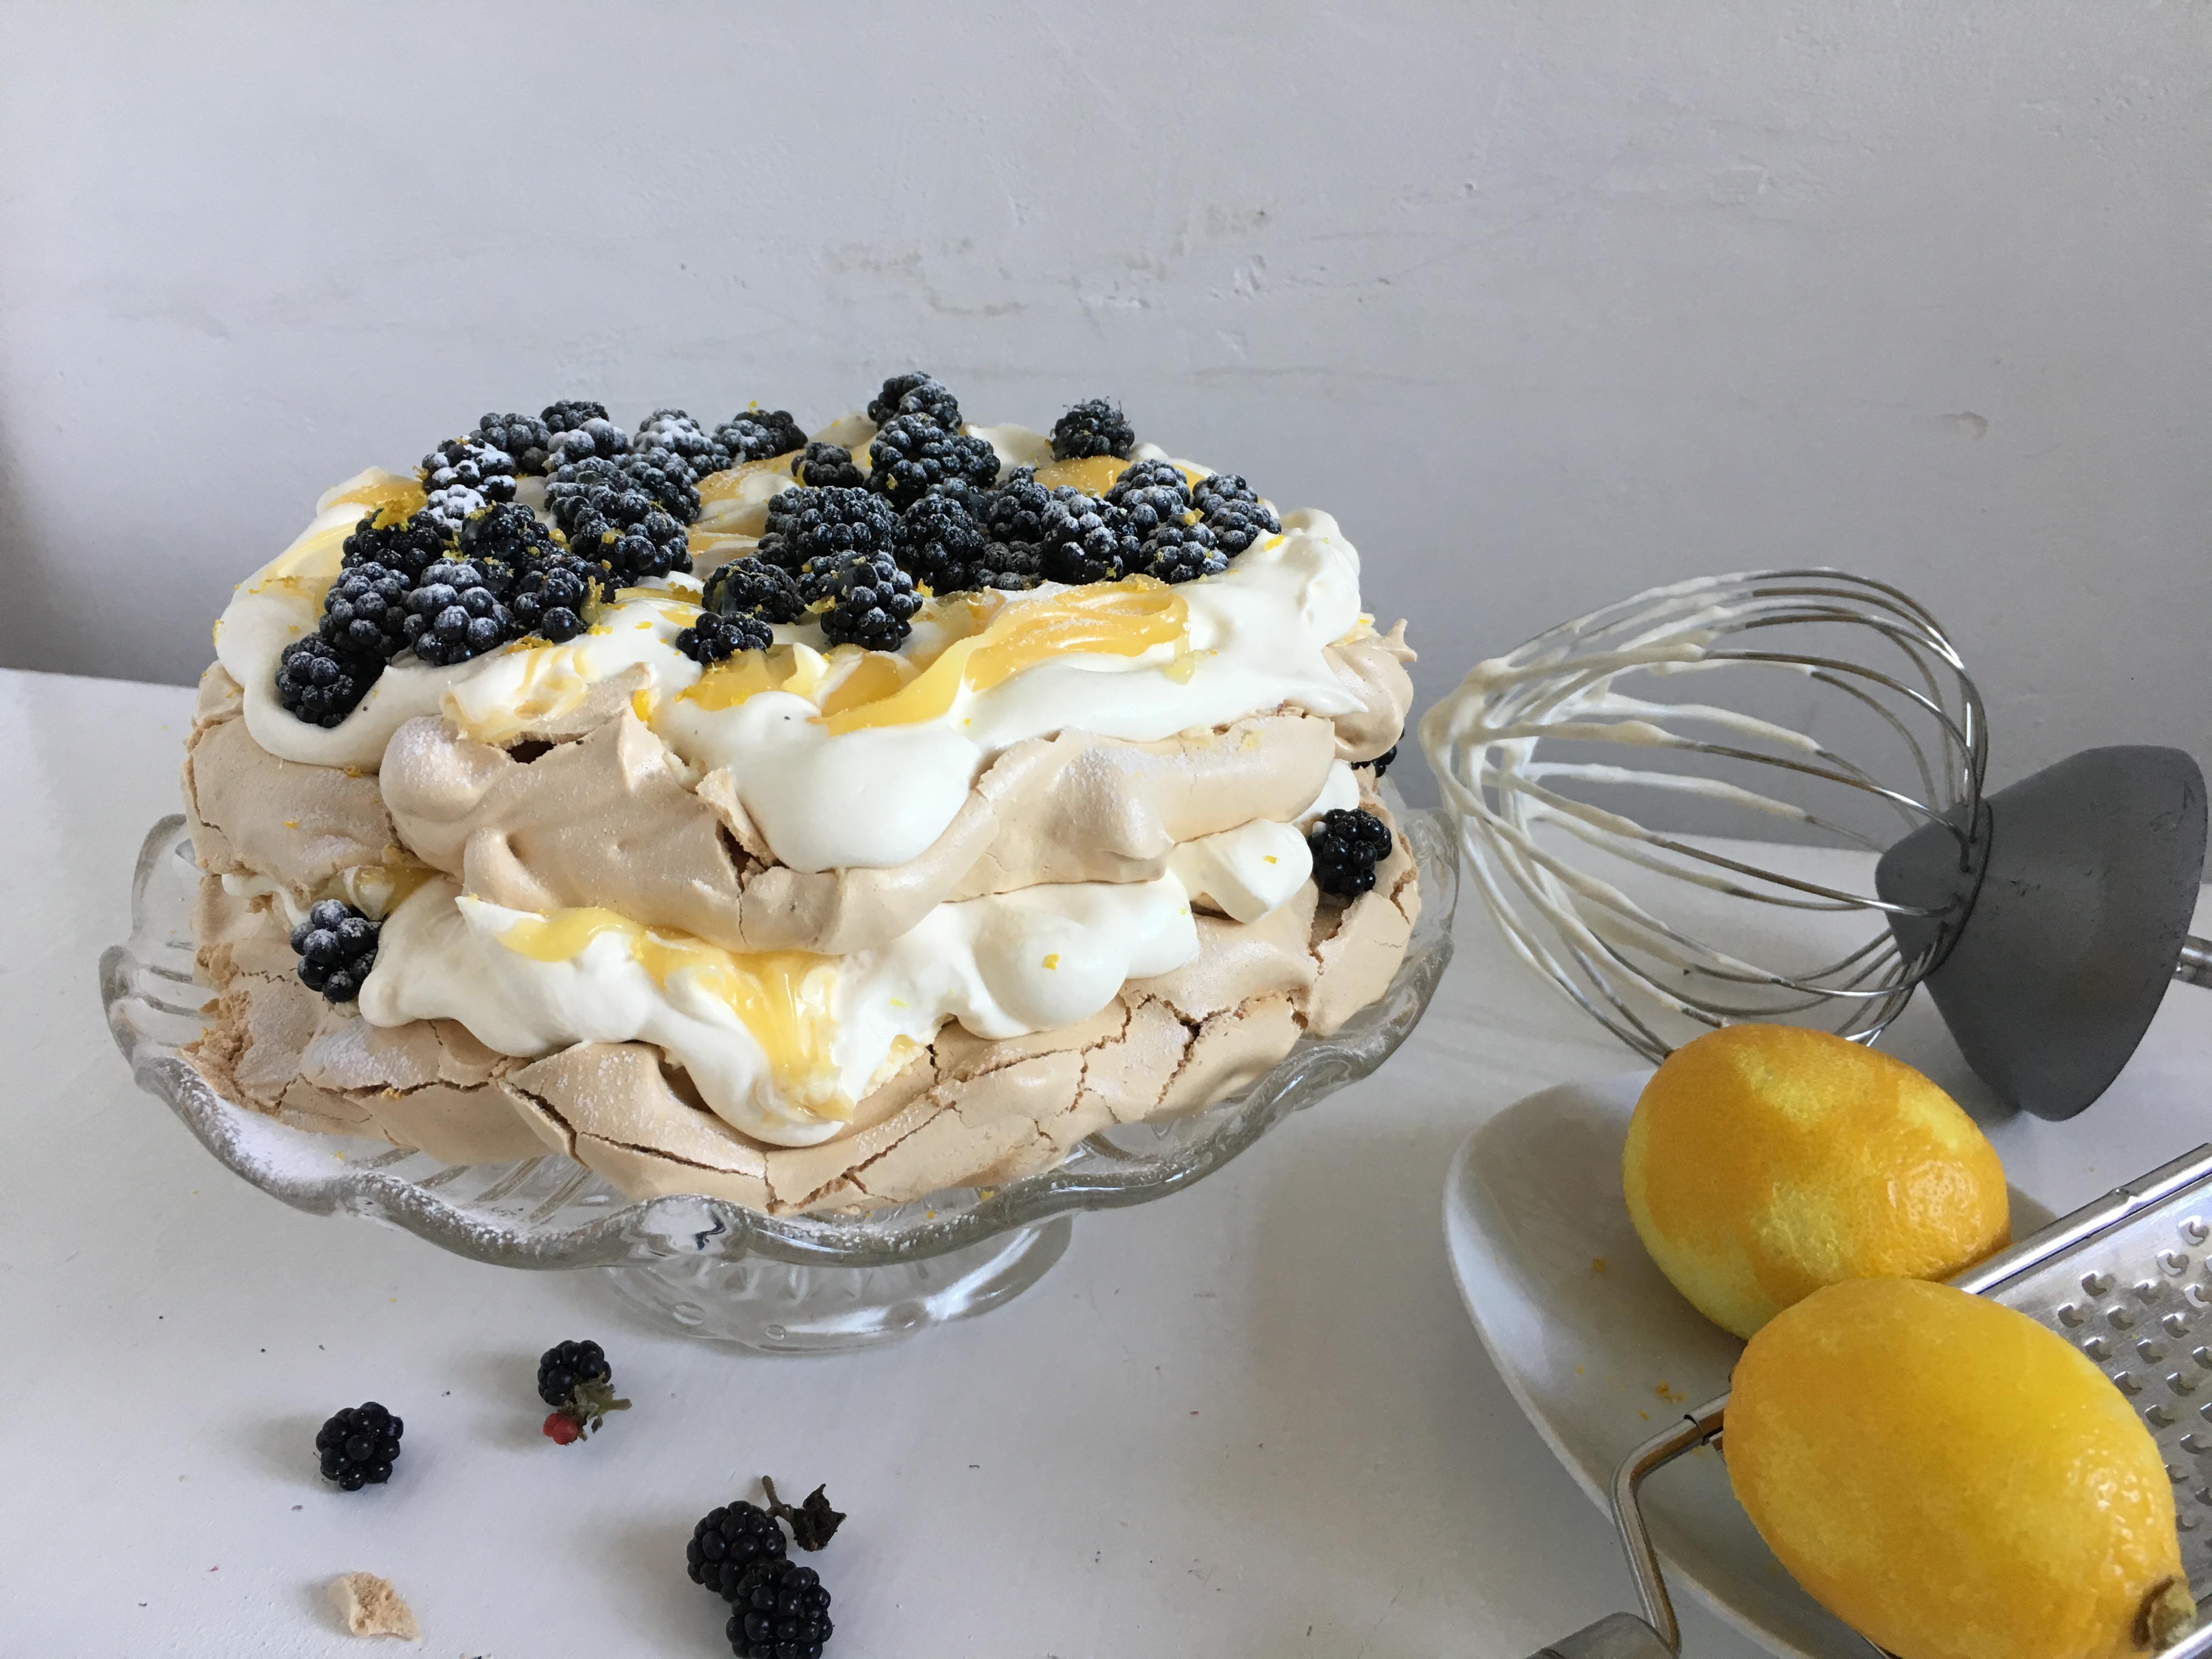
So, this is  belter of a pudding, just the ticket for this time of year whilst there are heaps blackberries around.  It is also very straightforward, you can make the meringue discs days in advance and I  have used a good store bought lemon curd.  Do make your own if you have the time and the energy, I didn’t and was perfectly happy with a shop version on this occasion.  Crunchy and chewy meringue, dusky and toffeeish from the brown sugar, vibrant lemony curd marbled into whipped cream and the deepest dark purple berries.

Most of the year the brambles are a pest in the garden, catching and scratching you endlessly.  At the moment though, I am delighted to see their little berries almost as black and shiny as the jet buttons on a Victorian governess.  Take delight in them as like all other seasonal treats they will be gone in a flash.  You could make this with those big, blowsy blackberries you can buy in the shops but that misses the point of these autumn treasures.  I picked the ones you see here whilst the meringues were cooking.

So have a go at this, it really is as stunning as it is delicious and if you miss the boat with the blackberries try it with some late autumn raspberries.

Blackberry and Lemon meringue 3

Brown Sugar Meringue Cake with Blackberries and Lemon Cream

The first time I marbled the lemon curd directly into the whipped cream and then spread it onto the meringue discs but I found it got a little lost.  I then blobbed the lemon curd onto the cream once this was already spread and then marbled it a little which I prefer as it is more distinct.  Obviously do as you choose.  Likewise use as much lemon curd as you like, I used just over half a jar.

3 egg whites

100g soft brown sugar

50g golden caster sugar

600g double cream

1/2 -3/4 jar good lemon curd

Blackberries, as many as you want

Zest of one lemon (optional)

A little icing sugar to dust

Draw two 20cm circles on baking parchment and put them onto baking sheets.  Preheat the oven to 140c.  Whisk the egg whites until soft peaks form and then add both sugars a spoonful at a time whisking well until you have a shiny, stiff mass.  Divide this between the two baking sheets creating two 20cm discs, smoothing the tops.  Bake for one hour swapping the tins half way and then turn off the heat but leave in the oven to cool.  When they are cold peel away the parchment and put one onto your serving plate, whisk the cream until just holding its shape and spread half onto the first meringue disc.  Dollop lemon curd over the cream and marble it slightly with a knife then scatter over some of your blackberries.  Place the second disc on top of this and repeat this time using up the rest of your blackberries.  Grate over a little lemon zest if you want and dust with icing sugar.  Serves 6.

Blackberry and Lemon meringue 5

Elderflower Cordial

Elderflower 5

There is masses of elderflower around at the moment and I mean to make as much cordial as I can before it fades and leaves us for another year.  I have mentioned it before but I just love these seasonal treats – so much more special because of their fleeting presence.   Like the wild garlic which is now long gone from the river bank where it flourished only a month ago and all the other delights about to spring from the garden.   You might be able to buy raspberries year around in the supermarkets but do they ever taste better than when picked and eaten straight from the cane, warm from the sun?  Strawberries which can so often be a let down once liberated from their plastic shop cartons yet which carry that unmistakeable scent and flavour of summer when you find one perfect crimson specimen hiding under the leaves of a plant at your feet.

This cordial is floral, fragrant and delicious.  It has the most extraordinarily true flavour of elderflower and is unbelievably thirst quenching and refreshing.  As you will from the recipe it does contain a fair amount of sugar which I admit makes me wince a bit when I put it into the pan – what with trying to cut down on sugar and all that.  The thing is I like to offer my children squash and don’t think they should be limited to water or milk – after all I have wide range of drinks I can choose from!  What I don’t care for so much is the commercial drinks full of colouring, additives and other unpronounceable ingredients.  I may be conning myself but this just seems a little more natural.   You can reduce the sugar a little, play around and see what level of sweetness you prefer and don’t forget it is going to be highly diluted.

Elderflower Cordial

You need roughly 20 heads of elderflower for this but don’t panic if you can only find, or reach 15 or so,  it will still taste delicious.  Get citric acid from health food shops or the chemist.

20 elderflower heads, shake them gently to release any bugs

750g golden caster sugar

750ml water

50g citric acid

1 lemon, halved

Put the sugar and water into a pan and bring to the boil.  Put the elderflower heads into a large bowl and carefully add the sugar syrup.  Add the citric acid and squeeze in the juice from the lemons and add the halves to the bowl.  Give it all a good mix then cover with a tea towel and leave overnight.  The next day pour it through a sieve into another bowl or wide jug squeezing out the elderflower to get every drop.  Decant into a bottle and keep in the fridge.  Dilute as you would normal cordial with cold fizzy or flat water.  You could of course add it to a cocktail too….


Wild Garlic Pizza

Pizza WG

Last weekend I fell in the river.  I was keen to clear a bit of it that had got rather clogged up with logs, twigs and sticks after the last flood and had set out, pole in hand, to sort it.  I was leaning right over the river against an old tree stump in order to get the pole into the middle of all this debris when there was an almighty creak followed by a splash.  It seems this particular stump had long ago relinquished its hold on life, was entirely hollow and both it and I fell right into the river.  It was very cold.  I had been accompanied on this mission by Tom who, uncharacteristically for a Springer, doesn’t like water and was now pacing the riverbank anxiously presumably wondering what I was doing.  So, I was soaking to the waist and my boots were full of water but as I couldn’t get any wetter I decided I might as well carry on clearing the river and in fact it was much easier now that I was well and truly in.   Climbing out I found myself on nose level with swathes of wild garlic which is abundant along the bank and decided that is  what we would have for supper.

Each year we are spoilt with this particular foragers’ treat and I have made all manner of things with it, Wild Garlic Pesto (May 2013) and Wild Garlic Focaccia (May 2014) to name two.   I add it to salads, cautiously though it is pretty potent, and chuck into pasta dishes letting it wilt in the residual heat.  This years leaves have been around for a couple of weeks but it is only in the last few days that the white flowers have emerged.

We often make pizzas on a Saturday evening so I decided to see how much wild garlic we could get onto those.  My dough is a simple version of my white bread but with a good slosh of olive oil.  It is a dream to work with and cooks to a suitably crisp crust.   I decided to make my Fresh Herb Sauce (July 2013) with half parsley and half wild garlic which resulted in a pungent fabulously green number to drizzle over some of the pizzas when they emerged from the oven but you could just as happily use the Wild Garlic Pesto.  We strewed the pizzas with torn wild garlic leaves rather as I often use rocket and in fact rocket came into play when the wild garlic I picked had all gone and I couldn’t persuade anyone into the pouring rain to get more.

Pizzas are a personal thing and us such my family put different ingredients on each one – we usually start with a tomato sauce, the same one as used in my Meatloaf recipe (November 2015).  My son keeps his simple with cheese and salami, my daughter will add olives, capers and garlic to hers and my husband and I tend to add a good amount of chilli, mozzarella and lots of greenery when the pizzas emerge blistered and bubbling from the oven.   A trickle of good olive oil and a sprinkle of sea salt bring the whole together and I can’t recommend these enough.  They are a world away from wodgy doughy shop bought pizzas and, I tell myself, must be better for us….

Wild Garlic Pizza

The following makes four pizzas which are just the right size for us, two adults and two children but you could happily double the recipe.  Remember you need to allow time for the proving but unlike normal bread, the doesn’t really need a second rise.

250g strong white flour

5g quick yeast

5g fine salt

2 tablespoons olive oil

100-150 ml luke warm water

Toppings of your choice, see above, but probably to include tomato sauce, mozzarella or cheddar, salami or pepperoni, olives, chilli flakes, capers etc

Mix the flour, yeast, salt, oil and 100 ml of water in a large bowl, you may need some more of the water but probably not all of it.  Once it comes together in a dough knead it for 10 minutes by hand or in a stand mixer.  When this is a smooth ball, put a little oil into the bowl to stop the dough sticking and leave in a warm place for an hour or so until doubled in size.  Preheat your oven to 220 and put in a couple of baking sheets to heat up.  Divide the dough into four and roll out thinly but not too thinly or you will struggle to get them from your work surface onto the baking tray.  If you are worried about his roll them out on baking parchment and they can cook on this.  Don’t use greaseproof paper as the pizzas will stick to this, you will never get them off and will have to eat the greaseproof paper along with the pizza, I found this out the hard way.  Add whatever toppings you have decided on but don’t go mad, if they are too heavy or wet you won’t get a crisp bottom.  Carefully take a hot baking sheet out of the oven, sprinkle with semolina if you have some or flour, put your pizza onto this and bake for 8-10 minutes or until cooked, bubbling and blistered.  When it is done I thoroughly recommend torn wild garlic if you can get some or rocket strewn on top or the wild garlic fresh herb sauce.  Each pizza serves 1.