Pulled Pork

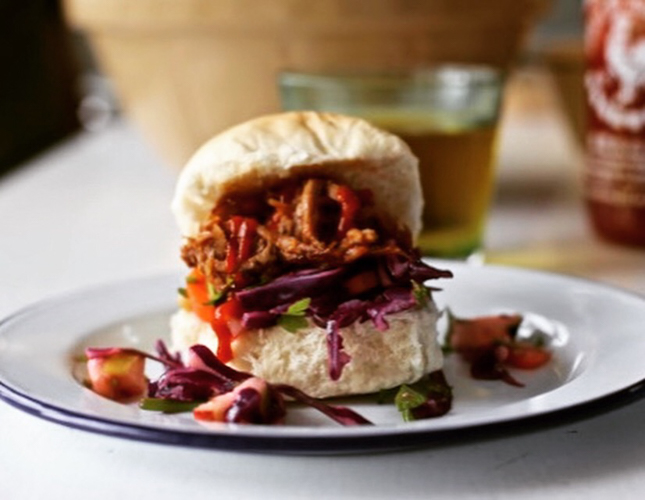
I can’t count how many times I have cooked this – any time of year it seems perfect, particularly when we have a load of friends round.  Very little hands on time, works a dream if you make it ahead of time and is an unbelievably economic way to feed a crowd. Did I forget to mention that it is also downright delicious.   Super tender, long cooked soft pork bathed in a sweet, spicy and tangy barbecue sauce stuffed in a soft bap with my crunchy, zippy fresh Christmas salad, topped with quick pickled onions and hot sauce.  Seriously, what is not to love.

I have made this with a whole shoulder and it made a huge amount, more than enough for 20 with extra for the freezer (a super useful number to have stashed away and it reheats a treat).  I tend to make this more often then with half a shoulder, rather easier to marinade and manoeuvre – last weekend one did 8 children and 6 adults with seconds.  I cooked it fully on Friday, shredded it (easier whilst warm) mixed it with the sauce and then reheated it in the oven on Saturday.  Too easy for words.

The Christmas salad (December 2013) despite its name is also a year round winner, crunchy and tangy, it works so well with the pork, they complement each perfectly.  Quick pickled onions (August 2014) bring a sweet/sour tang to the party and I couldn’t countenance my assembly without a good squirt of sriracha on top.

For pudding last weekend I made my son’s favourite, the Giant Strawberry Mivvi (June 2014), see the picture below.  This is a summer treat we look forward to all year and as it needs to be made ahead is another good one for entertaining.

Pulled Pork

1 heaped tablespoon paprika

1 heaped teaspoon smoked paprika

2 teaspoons fine salt

1 heaped teaspoon cumin

1/2 teaspoon cayenne

2 tablespoons soft brown sugar

20 turns of the black pepper mill

Shoulder of pork, around 5/6lbs

50ml cider (or white wine) vinegar

1 bottle good barbecue sauce

Mix the first 7 ingredients together in a bowl then rub into all sides of the pork.  Wrap tightly in cling film and leave in the fridge for at least 4 hours or up to overnight.  When you are ready to cook, preheat the oven to 200 and let the pork come to room temperature.  Put into a baking pan not much bigger than the pork, put the 50ml vinegar and 50ml water in the bottom of the pan (don’t pour it over the pork or it will wash off some of the spices) and cover with foil. Put in the hot oven and immediately turn it down to 160 and cook for 6-7 hours until the meat falls apart when prodded with a fork.   Pour all the cooking liquid into a pan, skim off the fat, pour in the barbecue sauce and simmer gently for 20 minutes until slightly thickened.  Meanwhile remove and discard the layer of fat from the pork, shred the meat and return to the baking pan.  When the sauce is ready pour it over the pork, mix well and serve.

Roasties with Chive Yogurt

Occasionally it’s not so much a new recipe I need, more a hint or reminder of something. After all I have many, many cook books full of recipes but sometimes lack of energy, time or ingredients mean I’m looking for an old favourite rather than a new idea.

So yes, this is a recipe for roast potatoes but how often do you think of roasties aside from Sunday?  These are an absolute winner and get eaten ridiculously quickly whenever I make them.  Not just any old roast potatoes these are canapé potatoes or something else for a mezze type lunch potatoes.   Pimp them up if you wish, a good dusting of paprika or chilli flakes would add pep and a handful of rosemary always works but I like them just like this, with salt and their tangy, chive and yogurt side.

I guess they are a little like potato skins – I know you can make these by baking potatoes and then removing the fluffy contents leaving you with the skins to roast and crisp but I never have.  I do however like the combination of crispy crunchy potatoes with a sour cream and chive style sauce.   This then is my way of doing things – you get the crispy skins but also the fluffy interior and I’ve gone for a yogurt based dip, similar but a little lighter and tangier than the original.

Sometimes I serve these alongside a main course but more often they are offered in their own right – a starter or a grazing treat to go with drinks before lunch or dinner.  A little dish of sriracha alongside offers that heavenly combination of the cold and creamy yogurt with a belt of chilli heat.  It’s not a spanking new fangled recipe, just the re working of an old favourite.

Roasties with Chive Yogurt

This is easily doubled or trebled which I would highly recommend.

500g potatoes, Maris Piper or similar

Olive oil

Salt

150g Greek yogurt

A handful of chives, finely chopped

A small clove of garlic, crushed (optional)

Preheat the oven to 200.  Cut the potatoes into chunks about the size of a large walnut.  Put into a large pan of salted water, bring to the boil and simmer for 10 minutes.  Drain really well, shake briefly in the colander and then put into a large roasting pan, add enough oil to just coat, turning the potatoes well.  Sprinkle with salt and roast near the top of the oven for 40-50 minutes until deeply golden and crunchy at the edges.   Meanwhile mix the yogurt, chives and a good pinch of salt and let down with a little water if you prefer a runnier dip.  Mix in the garlic if you are using.   Serve the potatoes on a large plate with the dip and perhaps some sriracha along side.   Serves 3-4 as a snack.


Teriyaki Chilli Salmon

This recipe really should be called salmon with a rattle around the kitchen cupboard, accurate but less catchy.   It came about ages ago after I’d seen something similar in a magazine but had none of the requisite ingredients.   I use teriyaki because that is what I had originally but light soy sauce will work a treat.  Sweet chilli sauce, ginger and a squeeze of lime are the only other additions along with salmon which I usually have in the freezer.  It defrosts quickly, is reliably bone free (happy children) and quick to cook.

Sweet, salty, hot and sour is nothing new and this combination of tastes are rightly celebrated. You won’t believe what a good foil they are to salmon and frankly supper made this quickly and easily can only be a cause for applause.  Serve on rice or turn some ready cooked noodles in the sauce to heat through – either way clean plates are to be expected.

Teriyaki Chilli Salmon

The coriander and spring onions make a pretty and delicious addition but don’t panic if you find yourself short of one or both of these two – the sauce will more than hold its own without.

2 fillets salmon

2 teaspoons oil

2 tablespoons teriyaki sauce (see intro)

2 tablespoons sweet chilli sauce

1/2 thumb size piece of ginger, peeled and grated

1/2 a lime, juiced

A few sprigs of coriander, roughly chopped

2 spring onions finely sliced

Mix the teriyaki, sweet chilli, grated ginger and the lime juice in a shallow bowl and put the salmon skin side up in this for 5-20 minutes depending on how long you have.  Heat the oil in a small frying pay and add the salmon skin side down.  Cook until the colour has changed half way up the fillets then turn and cook the other for about 5 minutes, adding the marinade for the last minute.  Let it bubble but don’t let it cook and reduce too much or it will become over salty.  Peel the skin off the salmon then serve pouring over the sauce and strewing over the spring onions and coriander if using.  Serves 2.

Spring Lemon Cake

I can’t tell you how many lemons have been squeezed and cakes made here in the name of research.  Lemon drizzles, lemon curds, lemon polentas and of course there is the layered beauty that features here in Lemon Cake and the 1970’s (May 2013) and often graces our table as our Easter Cake*.

I’m happy to eat a lemon based cake any day of the year but in Spring it seems even more appropriate.  That bright yellow zip and zest works perfectly when there is still a nip in the air but green shoots are on show and the hope of sunny days feels well founded.  This then is a cake for teatime, picnics or rainy days, trips to the beach, eating outside or in front of the fire and, of course, for all those school bake sales.

This modest looking little loaf cake has been tried and tested in many incarnations and this  is my favourite.  It couldn’t be easier, is very quick and a doddle if you have children who want to make a cake.  If you don’t have any lemon curd don’t worry it will still be delicious but it’s worth having a jar of good curd in the fridge for such occasions.  You can stick with a crunchy sugar and lemon drizzle if you prefer but this lemony icing is our perfect topping.  Finally, whilst I am a huge fan of butter, it has become quite expensive and Stork or similar works brilliantly here – if its good enough for Mary Berry, its certainly good enough for me!

Spring Lemon Cake

160g butter or Stork (see introduction)

120g caster sugar

Good pinch of salt

2 large eggs

140g self raising flour

1/2 teaspoon baking powder

Zest of one large unwaxed lemon

2 tablespoons milk

2 tablespoons lemon curd (see introduction)

150g icing sugar

Juice of 1/2 – 1 lemon

Preheat the oven to 180 and line a loaf tin.  Cream the butter or Stork and sugar together until light and fluffy, I use a stand mixer for this but a wooden spoon and bowl work a treat too.  Add the eggs one at a time with a spoonful of flour until well incorporated and then add the remaining flour, salt, baking powder, zest and milk.  Finally swirl in the lemon curd leaving a few streaks.  Put the mix into the lined tin and bake for 40 minutes.  Check after 30 and cover with foil if its brown on top before a skewer comes out clean.  Whilst the cake is cooling, mix the icing sugar and lemon juice (add the juice slowly as you may not need it all) and then pour over the top of the cake.  Leave to set and then tuck in.


*Whilst I know a Simnel Cake is the usual Easter offering and I love it, none of my immediate family like fruit cake (also my daughter is allergic to nuts).  Besides, we all know what happens to a cake when only one person likes it……

Blackcurrant Fool

Well, here is a blast of summer.   I’ve made no secret of my feeling that a weekend lunch isn’t complete without a pudding and we’ve tucked into no end of rib sticking treats appropriate to the colder months of the year.  Golden syrup sponge, plum galette, apple crisp, raspberry larder pudding and a whole host of crumbles have made an appearance recently.  Poking around in the freezer last weekend however I found a bag of blackcurrants which I’d picked last year and had been languishing in the icy depths since then.  Whilst my surprise clearly illustrates that I am not one of those with a list detailing the exact contents of the freezer, the weight and when it was frozen etc – I was jolly pleased with my find.

Thawed and simmered briefly with sugar I mixed them with cream and yogurt and we delighted in that mouth puckering, tangy, fragrant hit that is unmistakably blackcurrant. Should you have any berries in your freezer I highly recommend making this or simply buy a bag of frozen berries – I use them all the time in the winter for various recipes.

Blackcurrant Fool

Don’t worry if you have a few less (or more) blackcurrants – a fool is pretty forgiving and 20/30g either way won’t make much difference.  Equally if you need to use a bit less cream or yogurt the end result will still be fruity and delicious.

500g blackcurrants

100g caster sugar

200g double cream

200g Greek yogurt

Simmer the blackcurrants for about 10 minutes with the sugar until the fruit has broken down and the juices have become syrupy, cool.   Whisk the cream until soft peaks hold, add the yogurt, mix again briefly and then swirl in the blackcurrants.  Combine as much as you want – I like to seem some seams of pure blackcurrant but it is up to you.  This served 4 with a bit left over for someones breakfast.


Chicken with Flageolet Beans, Leeks and Rosemary

I am on a bit of a mission to increase our intake of pulses – they are cheap, filling and with a little magic can be quite delicious.  I love them (now) but one of my children isn’t mad about them so inevitably I have a bee in my bonnet to think of delicious ways to serve them up.  To be fair I didn’t really like pulses much when younger and would pick them out of a cassoulet or chilli and line them up around my plate.  It was always disappointing then to be asked to finish them, at this point cold and without anything more palatable to help them on their way.

This is a delicious combo then, leeks and beans to please me and crispy skinned chicken to please us all.  Don’t panic that four thighs aren’t enough, this is surprisingly filling and you can always serve another green veg or perhaps a crusty baguette and salad alongside.

The leeks, flageolet and rosemary work particularly well together and this makes a great side dish to roast lamb.  Pop it into an ovenproof dish, top with breadcrumbs and finish in the oven until crispy above and bubbling beneath.

Roast chicken with leeks, flageolet beans and rosemary

You can of course use dried flageolet, just remember to soak and cook them according to pack instructions prior to using them below.

4 chicken thighs

2 tablespoons olive oil

1 large or two medium leeks

1 clove garlic, finely chopped

1 sprig rosemary, leaves finely chopped to yield around 1 teaspoon

1 tin (400g) flageolet beans, drained and rinsed

250ml chicken stock

2-3 tablespoons double cream

Chopped chives or parsley (optional)

Heat the oven to 200, put half a tablespoon of the oil into a roasting tin, turn the chicken in the oil, season with salt and cook for half an hour.  Heat the remaining oil in a large frying pan and cook the leek gently, without colouring, until soft.  Add the garlic and rosemary, cook for a minute or two then add the beans, stock and cream.  Simmer for about 10 minutes until a little reduced then check for seasoning.   After its 30 minutes remove the chicken from the oven, add the leek mixture to the pan without getting sauce on the now crispy skin and return to the oven for a final 5-10 minutes until gently bubbling and gold skinned. Scatter over the chives or parsley if you are using them.  Serves 4.


Tarte Tatin

Well this is a proper treat and even better supremely easy to make with only 5 ingredients! That combination of tangy apples bathed in caramel sauce with a crispy, flaky pastry base, just fabulous.  Whilst there are many recipes out there for Tarte Tatin, this one is so simple and delicious that I rarely deviate.  It works like a dream and there is never any left over.   By the way if you are a fan of salted caramel puddings just up the pinch of salt in the ingredients to about 1/2 a teaspoon and voila you will have Salted Caramel Tarte Tatin.

A frying pan with an oven proof or removable handle is ideal but if you don’t have one just cook the apples in a regular frying pan and then transfer to a baking tin before topping with pastry and putting in the oven.  I use a 20cm le creuset that I have had for ever and these amounts work a treat and we easily finish it between the four of us.  I have also used a 30cm saute pan (also le creuset) which make a great big tarte but I did need a little help turning the pan over on to the waiting plate.

Tarte Tatin

I tend to use a pack of ready rolled puff pastry for this.  With a bit of careful cutting out (and patching for the second) I can get two circles of pastry out of one roll so either make another tarte tatin, freeze it or make the Onion Tarte Tatin with Blue Cheese (February 2014)…. just saying.

4 large eating apples, Braeburn are ideal, peeled, cored and quartered

60g butter

50g caster sugar

1 pack ready rolled puff pastry (usually around 375g)

Pinch of salt (see introduction)

Preheat the oven to 200.  Unroll the pastry and measure out a circle using the top of the pan.  Melt the butter with the sugar and add the apples along with a pinch of salt.  Cook for around 20-30 minutes until the apples are tender but not collapsing.  As it bubbles a caramel will form.  Turn the apples a couple of times for even cooking.  Remove from the heat, ensure all the pieces are round side down then extremely carefully place the circle of pastry over the apples and tuck the edges between the side of the pan and the apples.  Put in the oven for 20 minutes or until the pastry is golden and puffed up.  Take the pan out remembering of course that the handle will be hot and let it sit for a couple of minutes to settle.  Using a plate with a lip so you don’t lose all the sauce, invert this over the pan and quickly turn both so that the tarte ends up on the plate pastry side down, apple side up.  Adjust any apples that have slipped out of place and serve with cream.  I divide this into quarters for the four of us but reckon I could eat half without much trouble….


Cinnamon Buns

Sweet, squidgy, fragrant with spice – what’s not to love about a cinnamon bun?  As yet I haven’t met anyone who doesn’t weaken at the knees with the mention of a CB.  My children adore them and regularly make urgent requests for me to bake some.  There is no great secret to making these, bread flour rather than plain gives that fluffy soft dough which is then wrapped around a buttery, sugary cinnamon filling.   The final flourish of icing completes the picture and makes them pretty much perfection in our book.

So, whilst these are super easy to make remember to allow a bit of time.  Like other recipes using yeast it requires a couple of rises.  I give myself about a 4 hour time frame (which includes cooling them if you are going to ice them) but there isn’t more than about 30 minutes of hands on time.  Just letting you know in case you want to get them ready for the end of school….

Cinnamon Buns

I find a stand mixer easiest for this as it is quite a soft dough.

450g strong white bread flour

7g yeast

7g salt

60g soft brown sugar

1 teaspoon cinnamon

225ml milk, warmed to just blood temperature

1 egg beaten

75g soft butter, cubed

For the filling –

100g soft butter

80g soft brown sugar

2 heaped teaspoons cinnamon

200g Icing sugar

Put the flour, yeast, salt, 60g sugar and cinnamon into the bowl of your stand mixer.   Once mixing add the warm milk and beaten egg followed by the 75g soft butter, a bit at a time until it comes together then let this mix for 5 minutes.  Leave to rise for an hour in a warm, draught free place.   Roll the dough out on a floured surface until approximately the size of a tea towel then spread with the 100g soft butter.  Mix the 80g soft brown sugar and 2 teaspoons cinnamon together and then sprinkle this evenly over the butter.  Roll up from one of the long sides and then cut into even pieces about 2cm thick.  Depending on the length of your roll you’ll get about 12-16.  Place these cut side down and well spaced on a large baking sheet and leave to rise again for another hour.  Just before the time is up preheat the oven to 190 and then bake for 25-30 minutes until puffed up and golden.  Leave to cool.   Sift the icing sugar into a bowl and mix with just enough water to get the consistency you are happy with before trickling it over the buns either neatly and artistically or rather more erratically as I have done in the photograph above.


Meringues with Rhubarb and Ginger Cream

I adore rhubarb – its sprightly pinkness brings cheer to the sometimes dreary late winter and early spring table.  When there isn’t much in the way of home grown fruit around, robust rhubarb persists in growing regardless of the cold, its brave stalks standing proud whatever the weather.  Technically of course rhubarb is a vegetable and can be used in savoury applications but this recipe is unashamedly a pud, sweet and lip smacking.

Meringues with their crisp carapace and yielding chewy middles topped with poached rhubarb scented with a hint of orange and finished off with billowing clouds of whipped cream studded with preserved ginger.  Properly good.  I make this pudding a lot when rhubarb is around – it is a dream of a make ahead and as such I couldn’t recommend it more highly for entertaining.  The meringues can be made days if not weeks ahead as long as they are stored in an airtight container.  The rhubarb can be cooked a couple of days in advance and kept in the fridge and the cream whipped with the ginger a couple of hours before you need it.  You could omit the ginger if it is not your thing and add some vanilla to the cream instead.   Finally, baked plums are also delicious when rhubarb is not around and go very well with the ginger.

Meringues with rhubarb and ginger cream

Ideally I prefer to roast rhubarb but in this case your oven is busy with the meringues so I’ve given a stovetop method.  If you have done the meringues ahead of time or have two ovens heat the other to 190 and put the rhubarb in a shallow dish with the sugar, orange zest and juice and bake for 15 minutes (see photograph below).

2 egg whites

100g caster sugar

Drop of oil

400g rhubarb, chopped into short pieces

40g caster sugar

1 orange, zest and juice (remember to zest before you juice!)

300ml double cream

1 globe and 1 tablespoon syrup preserved ginger, finely chopped

Preheat the oven to 140 and very lightly brush a parchment lined baking sheet with oil.  Whisk the egg whites until stiff (like shaving foam) then add the sugar spoonful by spoonful until satiny.  Divide into four blobs on the parchment and fashion into rough nests.  Put in the oven, turn down to 120 and leave for 2 hours.  They should be spot on but if they are still a tiny bit soft leave in the turned off oven until its cool and they are dry.  Meanwhile cook the rhubarb very gently in a pan with the sugar, orange zest and juice until the sugar is dissolved and the rhubarb soft but hasn’t fallen apart.  When you are ready to serve whip the cream with the ginger syrup until just holding its shape then fold through the chopped ginger.  Put a meringue of a plate, pile on the rhubarb followed by the cream.  If you are keen on ginger you can trickle a little more ginger syrup over or grate some orange zest over for prettiness.  Serves 4.


Plum Galette

There is a definite nip in the air this morning and I feel we are now fully enveloped in Autumn and the treats it brings.  There is bonfire night to look forward to which always reminds me of those when I was a child.  Nibbling enthusiastically on a toffee apple but shamefully becoming bored once past the sugar and faced with the apple.  Hot dogs which inevitably leaked ketchup onto my woolly gloves and the glowing face that comes from a huge bonfire.

It is then a speedy tumble towards Christmas but I don’t want to become distracted by this end of the year fiesta and rather enjoy now.  Frosty mornings which lead to sunny but cold days, leaves changing colour then falling and the sparse bleakness of the garden.  On the flip side there is sloe gin to be made and stashed away, fires to be lit and all those culinary delights that were cast aside somewhere around early April.  Stews, hearty gratins and bakes, crumbles and cobblers filled with all manner of orchard fruits.  Rib sticking food to keep out the cold and to enjoy around the table with family and friends as the daylight fades.

My previous recipe for a galette was a nectarine and cherry one (August 2013) and it seemed long overdue to offer a more autumnal version, this fits the bill perfectly.  Unlike that summer version which suggested using bought pastry for speed (summer holidays and all) this time I make the pastry but you should do whichever works for you (I won’t judge).  I have used plums here because I can’t resist their juicy tartness, the perfect foil to crisp sweet pastry but you can just as easily use a few crispy apples (eaters not cookers here) perhaps adding a little cinnamon along with the lemon juice.  We have enjoyed this two or three times over the last week or so, my children love it with ice cream, I prefer it with cold pouring cream but can’t help thinking a really good vanilla custard would probably bring the house down.

Plum Galette

The amount below is just right for the four of us, a generous quarter each but then none left winking at me from the counter begging me to finish it (for which I am grateful).  The one in the photograph is simply this amount doubled and it happily served seven.  You only need a teaspoon of beaten egg for the glaze so take it from another egg that is being cracked for another purpose if possible otherwise use milk.

100g plain flour plus a heaped teaspoon extra

60g cold butter, cubed or grated

A good pinch of fine salt

60g caster sugar, divided in two

30ml cold water

6 plums stoned and each cut into sixths

Squeeze of lemon juice

A teaspoon or so of beaten egg (see introduction)

A dessertspoon of demerara or caster sugar

Preheat the oven to 190.  Put the flour and butter into a medium size bowl and rub together with your fingers.  There isn’t really enough to justify getting a food processor out. When it looks like breadcrumbs add the salt and 30g of sugar followed by the water, bring it together into a ball, wrap in clingfilm and leave somewhere cool for half an hour.  Mix the plums with the teaspoon of flour, remaining 30g of sugar and a squeeze of lemon juice.   Roll out the flour to a rough 30cm circle and place on a parchment lined baking sheet, tumble the plums onto the pastry leaving a good gap and turn this pastry edge over the plums.  Brush with your glaze, egg or milk and sprinkle with the dessertspoon of sugar.  Bake for 25-30 minutes until golden brown on top and crisp underneath.