Spring Lemon Cake

I can’t tell you how many lemons have been squeezed and cakes made here in the name of research.  Lemon drizzles, lemon curds, lemon polentas and of course there is the layered beauty that features here in Lemon Cake and the 1970’s (May 2013) and often graces our table as our Easter Cake*.

I’m happy to eat a lemon based cake any day of the year but in Spring it seems even more appropriate.  That bright yellow zip and zest works perfectly when there is still a nip in the air but green shoots are on show and the hope of sunny days feels well founded.  This then is a cake for teatime, picnics or rainy days, trips to the beach, eating outside or in front of the fire and, of course, for all those school bake sales.

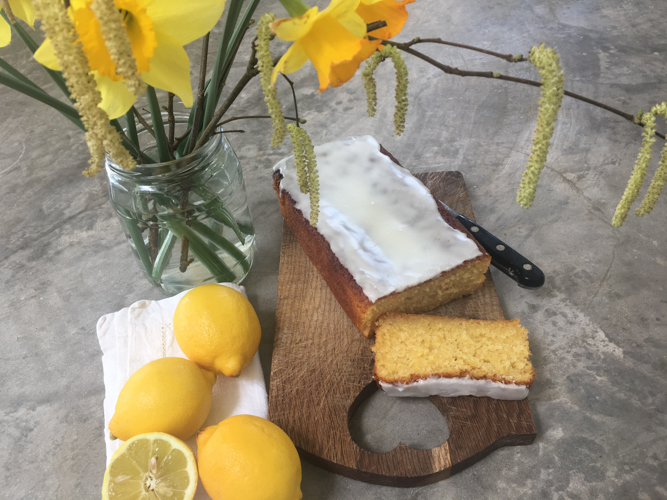
This modest looking little loaf cake has been tried and tested in many incarnations and this  is my favourite.  It couldn’t be easier, is very quick and a doddle if you have children who want to make a cake.  If you don’t have any lemon curd don’t worry it will still be delicious but it’s worth having a jar of good curd in the fridge for such occasions.  You can stick with a crunchy sugar and lemon drizzle if you prefer but this lemony icing is our perfect topping.  Finally, whilst I am a huge fan of butter, it has become quite expensive and Stork or similar works brilliantly here – if its good enough for Mary Berry, its certainly good enough for me!

Spring Lemon Cake

160g butter or Stork (see introduction)

120g caster sugar

Good pinch of salt

2 large eggs

140g self raising flour

1/2 teaspoon baking powder

Zest of one large unwaxed lemon

2 tablespoons milk

2 tablespoons lemon curd (see introduction)

150g icing sugar

Juice of 1/2 – 1 lemon

Preheat the oven to 180 and line a loaf tin.  Cream the butter or Stork and sugar together until light and fluffy, I use a stand mixer for this but a wooden spoon and bowl work a treat too.  Add the eggs one at a time with a spoonful of flour until well incorporated and then add the remaining flour, salt, baking powder, zest and milk.  Finally swirl in the lemon curd leaving a few streaks.  Put the mix into the lined tin and bake for 40 minutes.  Check after 30 and cover with foil if its brown on top before a skewer comes out clean.  Whilst the cake is cooling, mix the icing sugar and lemon juice (add the juice slowly as you may not need it all) and then pour over the top of the cake.  Leave to set and then tuck in.


*Whilst I know a Simnel Cake is the usual Easter offering and I love it, none of my immediate family like fruit cake (also my daughter is allergic to nuts).  Besides, we all know what happens to a cake when only one person likes it……

Cinnamon Buns

Sweet, squidgy, fragrant with spice – what’s not to love about a cinnamon bun?  As yet I haven’t met anyone who doesn’t weaken at the knees with the mention of a CB.  My children adore them and regularly make urgent requests for me to bake some.  There is no great secret to making these, bread flour rather than plain gives that fluffy soft dough which is then wrapped around a buttery, sugary cinnamon filling.   The final flourish of icing completes the picture and makes them pretty much perfection in our book.

So, whilst these are super easy to make remember to allow a bit of time.  Like other recipes using yeast it requires a couple of rises.  I give myself about a 4 hour time frame (which includes cooling them if you are going to ice them) but there isn’t more than about 30 minutes of hands on time.  Just letting you know in case you want to get them ready for the end of school….

Cinnamon Buns

I find a stand mixer easiest for this as it is quite a soft dough.

450g strong white bread flour

7g yeast

7g salt

60g soft brown sugar

1 teaspoon cinnamon

225ml milk, warmed to just blood temperature

1 egg beaten

75g soft butter, cubed

For the filling –

100g soft butter

80g soft brown sugar

2 heaped teaspoons cinnamon

200g Icing sugar

Put the flour, yeast, salt, 60g sugar and cinnamon into the bowl of your stand mixer.   Once mixing add the warm milk and beaten egg followed by the 75g soft butter, a bit at a time until it comes together then let this mix for 5 minutes.  Leave to rise for an hour in a warm, draught free place.   Roll the dough out on a floured surface until approximately the size of a tea towel then spread with the 100g soft butter.  Mix the 80g soft brown sugar and 2 teaspoons cinnamon together and then sprinkle this evenly over the butter.  Roll up from one of the long sides and then cut into even pieces about 2cm thick.  Depending on the length of your roll you’ll get about 12-16.  Place these cut side down and well spaced on a large baking sheet and leave to rise again for another hour.  Just before the time is up preheat the oven to 190 and then bake for 25-30 minutes until puffed up and golden.  Leave to cool.   Sift the icing sugar into a bowl and mix with just enough water to get the consistency you are happy with before trickling it over the buns either neatly and artistically or rather more erratically as I have done in the photograph above.


Beetroot and Carrot Cake

Beetroot and Carrot Cake 2

My children have exceptionally finely tuned radars when it comes to trying out new dishes and show particular suspicion if I ever respond “it’s a surprise!” when they are faced with something new.  They will fire questions about ingredients at me but I am used to this now and have a range of ripostes and distracting tactics at the ready.  I’ve perfected acting in a slightly deaf, vague fashion when being cross examined, sometimes I will deflect questions by posing a conundrum so complex, lengthy and bizarre back at them that they will have forgotten their original question or my absolute favourite when faced with a query I would rather not answer, I look intently at the window and ask “is that a badger out there?”.

These discussions and my slippery evasiveness usually come to the fore when a less than popular vegetable has been snuck into something under cover.  I do this in my never-ending efforts to find a way to make each and every vegetable delicious to my treasures.  Rather as it was with this Beetroot and Carrot cake.  Previously a regular kind of Carrot cake had been deemed acceptable so grabbing this particular baton, I decided to expand on the idea and add beetroot to the mix.

Now don’t misunderstand me, I am under no false illusion that by adding any old veg to a cake it miraculously becomes healthy.  There is a sea of treats out there that contain ‘better for you’ ingredients – sweet potatoes, date syrup, wholemeal flour, quinoa or whatever but treats they are.  A cake is a cake is a cake, something to enjoy occasionally but not every day.  The reason I make this one is because I think it is absolutely delicious.  The fact that it contains grated raw carrot and beetroot is a happy coincidence.

My son ate one slice of the first of these cakes but has mysteriously been full whenever offered a slice at a later date.  My husband said he like it but could see why the children didn’t which, in itself, was fairly damning and my daughter simply eyed it as one would a snake.

So to everyone who has tried this cake and loved it (even those who were told the pink bits were raspberries….) I say thank you and to my family I say, never mind, all the more for me.

Beetroot and Carrot Cake 1

Beetroot and Carrot Cake

Grating the vegetables in a processor can make it a bit wet so I tend to do it by hand with a box grater, it only takes a few minutes.

300g carrots and beetroot (untrimmed or peeled weight), grated

250g self raising flour

2 teaspoons baking powder

Pinch of salt

150g soft brown sugar

1/4 teaspoon ground cinnamon

150ml sunflower or vegetable oil, plus a tiny bit extra for greasing the tin

2 eggs, beaten

125g icing sugar, sifted

50g soft butter

200g cream cheese, at room temperature

1 lime, zest and juice.

Preheat the oven to 170 and oil a 20cm tin with a little of the sunflower/vegetable oil and line the base.   Sift the flour, baking powder and cinnamon into a bowl, add the salt and sugar followed by the grated carrot and beetroot and mix well.  Combine the oil and beaten egg and add this to the flour and vegetables and mix.  It will be a thick mixture!  Put into the tin, level the top and bake for 1 hour or until a skewer comes out clean.  Leave to cool in the tin for 10 minutes before cooling completely on a rack.   Meanwhile for the icing, beat the butter, sugar and lime really well before adding the cream cheese.  It is important that this is at room temperature so it mixes in easily, don’t over beat it as it will quickly become runny.  If it does however, don’t panic, just put it in the fridge until firmed up.  Spread over the cake.

Oaty Mincemeat Squares

Oaty Mincemeat Shortbread 3

I often make something we imaginatively call Jammy Oaty Slice – can you guess what is in it?  Of course you can and I highly recommend it as a delicious tea time offering.  The other day I was looking at a tray of it cooling ready for scoffing and it reminded me of the mincemeat slice that used to adorn the bakers’ shelf at Christmas in Yorkshire.  Heavily dredged with icing sugar, it was completely white from the top and the layers were crisp and even (really!) in the way only a practised hand can accomplish.

So of course I had to have a go at making it myself.  Whilst I love mince pies, my immediate family (i.e. the ones I actually live with) don’t like anything with cooked raisins or dried fruit.   This means that if I make mince pies then I am the only one who will eat them unless we have friends over and when it comes to a Christmas cake…. Well, suffice it to say I ate all of the the last one which graced a tin in our house.  All of it and I made another in January because I had enjoyed it so much…..

These little squares are much safer then.  Rather than a huge cake winking at me from the corner I can safely eat one of these treasures with a cup of tea on a daily basis without having to book into the gym afterwards.   Like two layers of shortbread with mincemeat in between, somehow better than a traditional mince pie if that is not too shocking a statement? The oats add an extra element which is just right and of course go a good way towards balancing out the sugar and butter.  Heading for health food is what I say….

Oaty Mincemeat Shortbread

Oaty Mincemeat Squares

If you want to go for the original Jammy Oaty Slice then just replace the mincemeant with jam, I favour raspberry.  However, please do give them a go this Christmas, they are a million times easier than mince pies if you need to make a batch for a sale and are just delicious.

250g plain flour

125g oats

135g caster sugar

200g cold butter

1 teaspoon baking powder

1/4 teaspoon fine salt

450g mincemeat

Icing sugar

Preheat the oven to 180.  Line a tin of approximately 23cmx32cm  with baking parchment.  Whizz together the flour, oats, butter, sugar, baking powder and salt briefly in a food processor (you want it combined but not forming a ball of dough as it needs to be quite crumbly for the top layer).  Tip half of the mixture into the baking tin and press it to cover the base in an even layer.  Spread the mincemeat over this and then sprinkle the remainder of the mix evenly over the mincemeat and press it down gently.   Bake for 30-40 minutes until golden on top.  Remove from the oven and leave to cool completely before dusting with icing sugar and cutting into squares.

Oaty Mincemeat Shortbread 2


Apple and Raspberry Crumble

Apple and raspberry crumble 4

I can’t tell you how much I love a crumble.  Plum crumble, rhubarb crumble, apple and blackberry crumble, all of them have a place on my table.  Childhood weekend lunches often finished with a fabulous, fruity and crunchy crumble whilst apricot crumble at school was a thing to celebrate, the best pudding of all and something that made other school food worth living through.

All that said however, I hadn’t thought of giving you a crumble recipe here.  Not out of meanness you understand, rather I thought everyone had a good, reliable crumble recipe up their sleeve to be whipped out when required. It was only after being asked for this particular recipe six time in a couple of months that I began to wonder and so I present it to you now.  Soft tangy fruit under a blanket of oaty, sweet and buttery crumble, let me tell you the sum here far, far exceeds the total of its humble parts.

This particular incarnation is my absolutely favourite, the bee’s knees and the vicar’s you know whats.  Although a straightforward apple crumble is still something to sing about, the addition of raspberries lifts it, their fruity tang and fragrance make this wholly lip smacking and satisfying which surely is what a pud is all about.  Can I rave little more?  It is and easy and cheap to make, a perfect way to use up any apples looking a little tired and frozen raspberries are perfect here so regardless of the season this can be on your plate in around an hour, start to finish.

Apple and Raspberry Crumble

Ideally use a combination of cookers and eaters, the bramleys are the ones that cook down to a velvety apple puree whilst the eaters retain a little bite.  I say 7 tablespoons of sugar and water as this is usually about right but depending on the tartness of your apples you may need more sugar and add more water if you think it is required.  You can cook the apples and make the crumble ahead of time but don’t put the crumble onto the fruit until you are ready to cook it as it will get soggy, ideally keep it in the fridge.

1 kg apples (see introduction), peeled, cored and roughly chopped

7 tablespoons golden caster sugar

7 tablespoons water

200g plain flour

100g cold butter, cubed

1/4 teaspoon salt

80g golden caster sugar

40g oats

150g frozen raspberries

Preheat the oven to 190.  Put the apples, the 7 tablespoons of sugar and water in a pan and cook gently until the apples are soft and broken down, about 20-30 minutes.  You may need a little more water once cooked and taste in case you need a little more sugar.  Do keep the apples tart though as the crumble bring sweetness to the party.  Meanwhile either whizz the butter and flour in a processor until it resembles breadcrumbs or do this by hand then add the salt, sugar and oats.  Tip the cooked apples into a suitable oven proof dish, I tend to use an enamel one which is 29x23cm and add the raspberries to this, mixing so they are evenly distributed in the apples, no need to defrost.  Tumble over the crumble and smooth it gently but don’t pack it down.  Cook for around 30 minutes or until bubbling at the edges and just browning on top.  This serves 6 or better still 4 with lots of seconds, I like it with cold cream or custard whilst my children prefer vanilla ice cream.


Blackberry Crumble Cake and the child who swallowed a fly….

Blackberry Crumble Cake

Once, when blackberry picking as a child, I swallowed a fly.  This moment has stayed with me and returns, annually.  Every year as I reach for that plump, glistening purple berry I remember the slightly panicked feeling that my eight year old self felt on the realisation that that fly had gone into my mouth and was not coming out.  The song about the old lady who swallowed a fly came rushing to mind and I wondered if I would have to follow her lead.  What actually happened was that I was encouraged to eat several more blackberries to help the fly down (remember no one walked around with small handy bottles of water in the early 70’s) and then get on with picking.

I can’t say I was harmed by this event as apart from my yearly recollection I adore blackberries and certainly wasn’t put off them by the experience.  Blackberrying is all part and parcel of autumn and I relish these moments during the year.  I’m an enormous fan of seasonal pursuits such as making marmalade when the Seville oranges are in season, elderflower cordial when those lacy white flowers are abundant and of course sloes to make fabulous heady sole gin with and then stash in a dark cupboard, saving for it for Christmas.

This cake will be ready to enjoy much sooner than sloe gin and is perfect to make with any blackberries you might pick at the weekend.  It won’t matter if any of them are squashed by little hands or in my case, by Tom putting his paw on the bag as we drove home.

Blackberry Crumble Cake

I made this in the summer with blackcurrants and raspberries and it was great, their tangy sharpness a perfect foil to the sweet crumble.  Now though I am using blackberries or plums, you could try apples and pears as well.   This would also work very well as a pudding with custard or cream (ideally followed by another slice for tea).

100g soft butter

100g golden caster sugar

2 eggs

175g self-raising flour

1 level teaspoon baking powder

1 teaspoon vanilla extract

3 tablespoons milk

Pinch of salt

200g blackberries (around 200g it doesn’t really matter if you have a few more or few less)

For the crumble –

25g butter

75g plain flour

40g demerara sugar

Preheat the oven to 170 and butter and baseline a 20cm tin.   Cream the butter and sugar together until pale and fluffy.  Add the eggs one at a time with a little flour each time then sift in the remaining flour and baking powder, add the vanilla, salt and milk and combine.  Put the mixture into the tin, smooth the surface and scatter over the blackberries.  Melt the butter for the crumble in a small pan mix it with the flour and sugar in a small bowl.  Sprinkle this over the blackberries and bake for 50-60 minutes but check after 40 and if the top is browning too much cover with foil.  Once it is done, leave in the tin for 20 minutes and then remove from the tin and tuck in if you are serving it warm as a pudding or leave to cool completely.  Dust with icing sugar if you want.

Blackberry Crumble Cake 3

You may recognise this recipe from last year, I am posting it again partly because it is perfect for this time of year but also because following our house move we still haven’t got any Internet. Back soon with lots of new recipes!


Weekend Food

Marble Cake close 2

We had a houseful over the weekend with extras for lunch on Sunday and whilst I wanted everyone to be well fed of course, the last thing on the menu was for me to be stuck in the kitchen (hissing) all weekend.  With ages ranging from 18 months to grandparents and childrens’ teas to add to the mix I had much to do.  Nothing for it but a bit of organisation, a good list and setting Friday morning aside to get ahead.  I thought I’d let you know what we ate and what I was able to prepare beforehand in case any of these tips help.

Saturday lunch was a picnic with Cannellini Bean, Parsley and Lemon Dip (April 2015) with grissini (recipe coming soon) and Wild Garlic Focaccia (May 2014) alongside a big plate of salami, a bowl of tomatoes and a good chunk of cheddar.  For pudding we had meringues with vanilla bean cream and chocolate sauce (recipe coming soon).  I made the grissini, focaccia, meringues and dip on Friday so putting lunch together on Saturday only took a few minutes.  Incidentally the dough for the focaccia will happily sit in the fridge overnight so it can be baked just before lunch.

Wild Garlic Focaccia

At tea the children had orzo with bacon and tomato sauce (June 2015).  Pudding, and for us to tuck into with a cup of tea, was a Chocolate and Vanilla Marble Cake (October 2013) which I made on Friday.  For supper we had Chicken with Harissa (October 2012) with Little Rosemary Roasties (March 2015) and my favourite Green Salad (January 2014) – couldn’t have been easier.

On Sunday we had Lamb which had been marinading in garlic, lemon and rosemary.  With this Fresh Herb Sauce (July 2013) but I used half mint and half parsley which made a funky full of flavour modern take on old fashioned mint sauce.  It went down an absolute treat.

Asparagus with parmesan

We didn’t need much for supper so I roasted several bunches of fabulous in season asparagus (June 2014) followed by Vanilla Pannacotta (July 2014) with poached rhubarb, both of which I made on Friday.

At each sitting I was delighted that the children scoffed everything except one who found the colour of the fresh herb sauce too alarmingly green.  Admittedly I gave myself quite I lot to do on Friday but I have to tell you it was worth it and it helped to know anything left to prepare was easy and also that so much was already in the fridge or cake tin.

Finally please don’t think there is even one iota of smuggery here,  I am rarely this organised but have proved to myself this weekend the virtue of planning and preparing ahead.  You may always be this organised but if not, I hope some of these tips and recipes might help you breeze through it next time you have a houseful.

One more thing, I finished off the leftover poached rhubarb and vanilla bean cream with a last meringue and it was fabulous.  It reminded me of a rhubarb pavlova that I made a couple of times last year and I will post that recipe soon.


Raspberry Larder Pudding

Raspberry Larder Pudding

Remember I said I couldn’t imagine Sunday lunch without a pudding?  This one is another contender for the ‘had to be rustled up from an empty larder’ prize.   Our plans changed one weekend and we found ourselves at home, a main course had been found but a pudding was, of course, required.

I always have frozen raspberries tucked away and am never without a jar of raspberry jam for breakfast or just in case it is a day for scones.  In this instance I used the final jar of the Loganberry jam I made last summer and there couldn’t have been a more fitting or appreciative last hoorah for it.  I would get panicky if I didn’t have the wherewithal to make a cake in the house and so it was that all these ingredients made themselves available.

Raspberry Larder Pudding 2

This is essentially a light vanilla sponge atop a juicy, fragrant, sweet and sharp raspberry sauce – but it is so much more than merely that!  With cold double cream (for me) or further heady vanilla in the shape of ice cream (my husband and children) this is dream worthy.  Somehow a pudding of distant memory or perhaps just nostalgia as I don’t recall ever being given this as a child.

No matter, make this next time you need to rustle up afters a bit pronto and find yourself caught short in the shopping department.

Raspberry Larder Pudding

100g soft butter

100g golden caster sugar

2 eggs

125g self raising flour

2 tablespoons milk

150g frozen raspberries

1/2 jar raspberry jam

Icing sugar to dust

Preheat the oven to 180.  Place the raspberries in an ovenproof 1 litre dish and dot over the jam along with 2 tablespoons water, give it all a mix and set aside.  Cream the butter and sugar well and then add the eggs one at a time with spoonful of flour.  Finally gently mix in the reminder of the flour along with the milk and a pinch of salt.  Pour this batter over the raspberries, smooth to cover and bake for 35-40 minutes until just firm on top, you can put in a toothpick to double check, if it comes out clean it is done.   Dust with icing sugar if you like, serves 4.  This is easily doubled in which case you will need to cook it for about 1 hour.

Raspberry Larder Pudding 3


Buttermilk Scones

Scones-2

This weekend we had proper blustery, stormy weather.  The sort where you either struggle to walk into the wind or, if you turn around can lean against the wind feeling it almost support you.  I am not so keen on rain but as long as wrapped up well, this chilly, wind howling Wuthering Heights sort of weather is fantastic.  You come home with your hair whipped around your head, tingling ears and a good, healthy, rosy-cheeked glow.  There is something entirely satisfying in this and even more so if a treat awaits you at the end of your walk.

So it was on Saturday afternoon when my little boy and I decided to make scones.  Now I usually think of scones as an outside in the garden, summer tea but I don’t know why.  They take minutes to whip up and are a supremely good treat in front of a cosy fire after an invigorating walk (equally good without the walk too).  Ours were being eaten within an hour of us having the idea and they were great fun to make with my son.  His pride in the finished article means he will not only be keen as mustard to make these again but to perhaps try something new next time to add to his repertoire – win, win.

You may have spotted an error in the whole scone with jam and cream scenario in the top photograph but don’t worry, in the time it took for us to make them, a kind man nipped out and bought clotted cream to accompany the jam on the scones and they were fabulous.

Scones 2

Scones

If you want to make these and don’t have any buttermilk to hand just mix 1/3 yogurt with 2/3 milk up to 300ml.  Bear in mind though that buttermilk has a fairly long (fridge) shelf life and is available in all supermarkets.  You can also use it for my seedy soda bread (April 2013) which is just the ticket with soup and very quick to make (no rising).

450g self-raising flour

100g cold butter

1/4 teaspoon salt

85g golden caster sugar

284ml pot buttermilk (make it up to 300ml with milk)

Preheat the oven to 200.  Whizz the flour and butter together until like breadcrumbs, add the salt and sugar and then gently by hand mix in the buttermilk until it all comes together.  Gently form the dough into a ball and roll out until about 5cm thick.  Cut out to whatever size you like and place on a lightly floured baking sheet.  Bake in the preheated oven for 15 minutes but check after 12 (if you have made jumbo scones they might need a minute or two more).  This will make 10-12 scones depending on the size you choose.  They are best eaten on the day they are made, which shouldn’t be a problem, but you can reheat the next day if needs be.  Serve with jam and cream (of course!).

A Buche de Noel….

Buche de Noel 1

Buche de Noel sounds rather more charming than Christmas Log doesn’t it although neither name really conveys the pleasure of eating this.  Never mind, the answer is to press on and try it for yourself to see how very, very delicious it is.

This came about because none of my family are very keen on mincemeat based puds which puts Christmas pudding, mince pies et al fairly firmly out of the window.  Indeed it came down to me to be solely responsible for the consumption of our Christmas cake last year (and the second one I made in January because I was so bereft when the first was finished, but that is another story).

So I set about finding something that is both festive and celebratory but avoided raisins or mincemeat.  Some sort of Buche de Noel came to mind and I liked the idea of Marsala as I find is heady warmth particularly suited to this time of year.  Tiramisu in its usual form is popular chez May so I decided this was the way to go.

This is both light and rich if that is not an oxymoron.  What I mean is that you feel as if you have had a proper treat, boozy and creamy and yet don’t immediately need to lie down in a cool room because you are so stuffed.  If that weren’t enough I think it is an absolute stunner – it brings to mind Biba mocha velvet with a cappuccino colour, floppy satin pussy cat bow….  Happy Christmas!

Buche de Noel 2

A Buche de Noel

This an easy pudding and you can make the components ahead of time.  The chocolate outer you see in the photographs was made a day before and kept rolled in a cool place before being filled – as you see it looks a picture and I must tell you, tasted divine.

5 teaspoons coffee (made with 1/2 a teaspoon of instant coffee and 6 of boiling water)

6 eggs

130g caster sugar

50g cocoa, plus extra for dusting

250g tub marscarpone

6 teaspoons Marsala

2 tablespoons icing sugar

Preheat the oven to 170 and line a swiss roll tin (approx 34x24cm) with baking parchment.  Put the egg yolks and sugar in one bowl and whisk until pale and doubled in volume;  put the whites into another bowl and whisk until soft peaks form.  Sieve the cocoa into the egg yolks along with 2 teaspoons of the coffee and combine.  Add a third of the egg whites into the yolks and mix well to slacken the chocolate mixture then add the remaining whites in two lots, combining very gently.  Pour the whole lot into the prepared tin and cook for 15 minutes until just firm on top.  Whilst it is in the oven dust another sheet of parchment with cocoa.  When the chocolate mix is cooked, carefully tip it out onto the cocoa dusted parchment, cautiously peel away the “cooked” parchment and starting from the short end, firmly (but gently!) roll up, using the paper to help you and leave it to cool.

Meanwhile mix the mascarpone, marsala, icing sugar and 3 teaspoons of the coffee together and taste, you might decide you want a little more sugar or marsala…!  Carefully unroll the chocolate outer and spread the marscarpone mixture over it, then roll it up again.  It may crack but usually stays together pretty well and anyway, it really doesn’t matter.  If you want you can dust with more cocoa, a snow fall of icing sugar or a grating of chocolate – up to you.  Serves 6-8 depending on how generous your slices are and how much you want left over…..

Buche de Noel 4